Java Alert Code For Wapka site

Java alert code may generate a small window with a message when a user enter or exit from your site.
To add this on your site Simply log in your wapka account admin mode

Click ::Edit site::
>> Select WML/XHTML code
Past below link on text area and add your links and titles on the code click on submit Button.

Alert Code

:

Enter Alert


Exit Alert


Click on Submit Button.

Online User Status code for wapka site

Online User Status code for wapka site

Online User status code used to display online users details, such as country, ip address, phone type etc.
To add Online User Status Code
Login your wapka account Admin Mode

Go to ::Edit site::
>> Select WML/XHTML code Past below code on text area and click on Submit button.

How can i add Facebook Follow Button in Wapka Site

Facebook Follow Button for Your Wapka Site

Facebook is the best social site in the world.
Many times we used Facebook like button in our wapka site.
Now in this tutorial we know that how to use Facebook follow button on our favorite wapka site.
It is very important for blog and personal sites.
So let's start our journey to add this.

How to Add

1. First Login your wapka site.

2.Then click on Manage from Site List.

3. Click on Admin mode.

4. Click on EDIT SITE(#).

5. Click on WML/XHTML code.

6. Then paste the following code into the WML/XHTML code box.
Note:

Change the
https://www.facebook.com/cuteaursa
with your facebook profile url.

If you want to hide profile photo below the button replace true with false.

You can customize height and weight as you like.
Minimum width:225. Default width:450.
Height:35( without photos) or 80(with photos).

9. Then click on Submit.
Now you are done.

Forum Counter Code for wapka site

Forum Counter Code for wapka site

Forum counter code help you to count Total Message, Total Topic/Theme, Today Created, Today Posted in your WAPKA site forums.
To add this on your site.

Simply log in your wapka account Admin Mode.

Click ::Edit site::
>>Select WML/XHTML code
Past below code on text area and change 'FORUMID' to your forum id.
To find forum ID go to the forum and find it on bottom of the forum.
After change the forum ID click on Submit Button.  

How can i create sitemap for wapka site

How can i create sitemap for wapka site

Search engine optimization have a key role to run a website successfully.
Search engines automatically crawl your web sites automatically and optimize your site for search but some times it take long time to index your site automatically and have more chance to miss your important links.
So if you want to optimize your site manually you need to give site maps to search engines.
Site map is a XML file that consist all links from your website.
By submitting site maps search engines can easily index your all pages from your site and get more traffic from search engines.
This post tells you How to create Site map for your mobile website build with wapka.

Step 1: Log in to your wapka site Admin Mode

Step 2: Click on ::Edit Site::

Step 3:Click on Global Setting

Step 4: Click on HEAD tags (meta,style,...)

Step 4: Click on Edit sitemap file (sitemap.xml)

Step 5: Insert Site ID and Click on Set buttoninsert site id
Separate Site ID with Comma (0,1,2,3,4,5)

To add forum links just insert f&forum ID (Eg:- f12345)

Your Sitemap generated successfully!
Your Sitemap located at
address.wapka.mobi/sitemap.xml

Just submit your sitemap on popular search engines like Google, Bing, Yahoo, etc

Drop Down Menu Code for wapka site

Drop Down Menu Code for wapka site

Dear friends do you like to create a drop down menu on your wapka site.

Like this :
Simply login your wapka account admin mode
>> Click ::Edit site::
>> Select WML/XHTML code
Past below link on text area and add your links and titles on the code click on submit Button
Drop down menu appear on the page.
If you want see it all pages of your website add this code on 1 ,3,2 page.

call me now code for wapka site

CALL ME NOW CODE FOR
WAPKA SITE

Wapka call me now code is the best tool for webmasters who publish their phone no their website.
With this code your user able to contact by your mobile number directly from your website.
Simply clicking Call Me Now link.

Notes:

1.Change 123xxxxxx to your mobile number and If u wants customize Call ME NOW Title.
Just change it!

How to add this on wapka

*.Login as admin mode

*.Click ::Edit Site::

*.Click wml/xhtml code

*.Paste the JAVA script on text area

*.Click Submit button

*.now you have add Successfully To Your Site

Free Logo Maker Tool for Wapka site

Free Logo Maker Tool for Wapka site

Logo maker tool help your website users to design new text logos.
With this tool user can edit font size, font colour, font style, font background colour and simply download His/hers text logo by click on Download button.
To embed logo maker on your wapka web site.
Go to::Edit site::
>> Select WML/XHTML code
Past below code on text area and click on submit button.

After complete this steps the Logo Maker tool appear on your website.

How to add Google Search Box in Wapka site

How to add Google Search Box in Wapka site

Google is a most popular search engine in the world.
Google now provide custom search engines for webmasters, which help your website users search your site with Google search engine without leaving from your site.
Do you want a Google Search Box on your Wapka site?

*.Login your wapka account and go to admin mode

*::Edit site::

*.Select WML/XHTML code

*.Past below code on text area and click on submit button.

After complete this steps the Google Search Box appear on your website.

Notes: if you wants search data only form your site, replace Your Site address here to your website address.
Example: http://cuteaursa.blogspot.com

*.Your site must indexed on Google
*but if you wants search data from google, remove your address here

How can i delete Bottom Link From Wapka Site

How can i delete Bottom Link From Wapka Site

In this tutorial I will show you how to remove this :=: bottom link from your wapka site

Lets get rid of this annoying link in your wapka site.
Just follow these steps.

1. Login to your free wapka account

2. Go to Admin mode

3. Go to edite Site > Global Settings > OTHERS

4. At the top of next page you will find selection box with message Bottom link :=:, from the options select the Disabled for all options

5. Now press the Set button, it will save your settings.

6. Now you can go to your home page and check if the bottom link is there or not, if its there than probably you have done something wrong, just read the above steps.
Now you can get rid of the annoying bottom link in wapka, I remembered at first this link was not erasable but lots of users requested to add option to total remove it feom our site and option is added.
I hope you will get something from this tutorial, comment if you can't set it in your site.

How can i Delete Wapka Site Permanently

How can i Delete Wapka Site Permanently

wapka delete Not happy with you current site or for any reason if you are searching for how to delete your wapka site then you are at right place.
you will not found any delete button in wapka as you press it and 1-2-3 bang your wapka site destroyed.
then question comes - is wapka site user have power to delete their own site from wapka's database ?
you will get ans soon!

If you are reading this post and hopping you can delete it then wait.
YOU CAN NOT DELETE SITE FROM WAPKA! (for security reasons).how to delete wapka site
Above image is the admin's ( wapka.com) replay for the same question.
Dam then what?
don't worry about it i am here to help you i will tell you steps involve in how to delete or remove wapka site.

How To Delete Wapka Site ?
we can do this by two ways, all methods are simple and tested on my sites.

Method 1

you may know that wapka's admin block sites if you do not follow their TOS. so we are going to take advantage of this i.e adding such things in wapka site wich are against TOS.
add some "THAT" type of pictures and don't ask what is "that" means?
go to feedback section and tell them that this site is against TOS.
wait and magic will happens, wapka's admin block your site and what it's mean site is DELETED.

Method 2

This is simple method. in this you have to delete all elements from homepage and all your wapka site pages will get deleted within 1 day.
but when your user will open your site they just find a blank page, just same as when you have 1st time seen it.

All 2 methods are listed above are 100% working and practiced by me.
i will strongly tell you to go with Method 1.

how to add time and date in wapka site

How To add Time and date In Wapka site

Are you searching for how to add time and date in wapka site ?
Adding time and day in wapka site is one of the great idea for newbies, and this can be done by adding simple HTML code.
Just copy paste simple time and date code in wapka site via HTML code section.

How To Add Time And Date Code

I will give you some different types of codes and also tell you how can you add any extra functions or remove any.
we will start from simple time and date code given in wapka site tutorials, if you don't know go to -
EDIT SITE >More advanced fuctions>Time function.
copy the code given below and paste to wapka's html code function.
Above time and date code shows result as
"Today is -DAY.MONTH.YEAR Hour:Minute:Secand it's beautiful day."

you can edit and add more functions in above time and date code for that we have to understand above code elements.
i will tell you that in 3 simple steps.

Step 1

Your code must start with :time-beg: and end with :time-end: this is compulsory.
ok then we have code as follows.

Step 2

Now we have to set time format.
ex- 11/02/2014 or 11 Feb 2014.
here small "j"
stand for "date",
small "n" for "month" and
"Y" for year and dot between j-n-y for showing (.) in formate.
( j n and Y are wapka tags).
for more tags go to>edit site>more advance functions >time functions.

Step 3

Add To Wapka site : You can replace the text given in above code "Today is (TIME AND DATE CODE) and it's beautiful day." and place that code into HTML codes.

Ways to use time and date code -you can use this time and date code directly to top of your wapka site for good user experience or you can also do one trick with the code such as "last update (time code)".
your user will think that site is updated today.

How to Remove Underline From Links In Wapka site

How to Remove Underline From Link In Wapka site

If you are new to wapka then you must have face the problem of underline below the links (also known as hyperlinks), actually this happens when you are using any pc browser or mobile default browser.
This type of problem don't appear in opera or uc.

How To Remove Underlines

To make your wapka site without any underline below links or hyperlinks, we have to add just one simple HTML code in HEAD section.
code will automatically remove all underlines from all your wapka site pages.
Copy the HTML code given above and paste it into the head section of wapka site, as soon as you will put that code in HEAD section all your wapka site pages will be without any underline for links.

NOTE-
Do not remove a from code.

How to put underline removing code for wapka site

*.Login to wapka.com

*.Go to edit site.

*.Global settings.

*.HEAD tag.

*.Paste and click set.
It is standard form that all links in HTML must be with underline below it, and all browser follow it.
This HTML tag for making hyperlinks underline free can be used directly in css file directly if you know css.

Also adding icons in wapka site one of the important if you want it look cool.

Now if you still want underline below some links use can use wapka's options in link section.
or by manually post text in HTML as <u>Your Text Here</u>.

NOTE - you can also use above underline hiding code in each single page, to do so paste code in HTML/WML section in edit site option.

How To Add Icon In Wapka Site

How To Add Icon In Wapka Site

Wapka.com allows you upload and add your own icons in your wapka site.
you can add icons in any wapka site with following easy steps.
Icons on site gives a professional looks and pleasant view.
you can add icons in diffrent size like 10x10px to 100x100px.
i will suggest you to use icons in wapka with size 16x16px.
icon demo
icon demo
We can also use icons as a link to bound your wapka site pages or icon just before the link.
we can also add different icons in same site or also in different codes.

You Can also add icons in registration page to make it beautiful.

How To Upload Icon In Wapka

You need to collect some small size icons from web which you want to use as icons, if you don't have check here-
http://softicons.com

After collecting the icons you need to upload in your wapka site, login to site and follow the procedure.

*. go to file maneger

*. upload icons.

*. now will find uploaded file in file maneger click on file id.

*. next to it you will find "use as a picture" option, click on it.

*. now last step, select icon size as 16x16 (recomended).

Remember

Here one thing must be note that if your icon have 20x20px size and you are uploading icon with more than 20px like 30x30px then transparent background of your icon gets black, it doesn't matter when you have black background site, but in case of other it will appear poor.
so you must select closer size for icon with its original diamention.
Now our half work is done,

how to use icon on wapka pages?

Their are two methods to use icons in wapka

1. direct URL

2. icon id (Easy and recommended)

1. direct url

go to wapka >edit site> pictures
find uploaded icon, click on "U" and copy the HTML code.

Now when you want to use that icon just put the icon code in WML/HTML section in EDIT site section.add icon

2. icon id

go to wapka >edit site > picture

find uploaded icon, note the icon id given in the form of "IC-XX" where XX must be a number like :ic-1:.
When you want to use icon just put that icon id in WML/HTML code, your icon will apear there.

you can also use icons as link, just check the "add link" section.

Why To Add Icons

It's Simple. Icons on webpage give a professional look and great user experience.
Just use correct icon and look your wapka site!
It's better than any other!

But you should be careful to select icon.
Large icons may slow down your wapka site loading.

now we have learn how to add icons in any wapka site with these simple methods.
upcoming post tell you more about wapka.com .

how to make custom link in wapka site

how to make custom link in wapka site

In this tutorial, I will show you how you can set permalink or more SEO friendly links in your wapka site.
After this tutorial, you will be able to set site_1.xhtml and similar sites to site_downloads or site_games etc.
So, lets get started.

Follow these steps to set SEO friendly PermaLink in your wapka sites.

1. Login to your free wapka account.

2. Goto "Admin Mode"

3. Add new Page via Edit Site -> NEW PAGE -> write/select these while creating the page

a. Site name:Downloads

b.Align:left

c.Font Style:none

d.Display after submit:Select Title Setting

e.Place item in front of:Select --- at the top

f.WAP2 style class:none

g.Join this item with previous:Leave as it is.

h.Item will be visible for:All users

i.Item protection (login access):Free Acces

j.Hot Key:none

k. Click Submit

4. After clicking the submit button you will see the Title Changing page.
In this page do the following

a.Title name*:Downloads

b.URL (site_931.html)**: In this field write what you wanna use in permalink, for example.
if you want site_downloads then simply write "downloads" in this field.
Allowed chars are
"a-z,0-9,-,_".

c. click
Edit Title

5. You are done, now you can access your page via
site_downloads.xhtml
instead of site_0.xhtml which is not user friendly.
You can even change permalink for already added pages as well.
I will write tutorial on it in separate post.

Need further help?
Let us know and we will solve your problem regarding this tutorial.

Stay tuned for further tutorials like this.

What is Differences Between Wapka Content Manager and File Manager

what is Differences Between Wapka Content Manager and File Manager

Here I am again today with second tutorial or you can call it gossip about the two tools wapka have for now.
Yeah, am taking about Wapka File Manager and Wapka Content Manager.
Lets differentiate between both of these point by point.

Wapka has two systems for file management, one is wapka file manager and the other one is wapka content manager.
Both of these are useful.
Also they have advantages and disadvantages.
Some of newbies just don't understand it quite well.
Here I am explaining both but with point by point differences.
Both of these have these differences.

1. Content Manager has o limit on how much you can upload and how much you can save in your wapka site.
File manager in this sense has limits and for newbies it have 200mb limit at first.

2. You can upload allowed files in content manager system.
I mean, you can only upload files whose extension will match the wapka allowed extension. For instance, you can not upload .css, .js files etc :)
File manager allows you to upload any type of file with any extension.

3. Content Manager has categorized form of directories in which you can upload files, but in file manager you first need to create folders then you can upload files for different directories.

4. Both of these tools have common dis-advantages.
Both of these tools have dynamic links to the file so no permanent link is allowed.
Therefore you can not add css files to wapka file manager and can not add js files for javascript.
Thats the biggest drawback.

5. Content manager has many tools which allows you to upload files in bulk,
file manager does not have one.
For example, you can collect 100 pictures render them to a .rar file and then upload it via content manager and all of your 100 files will be uploaded.

6. Content manager has own set of codes/tags and
file manager has own set of these tags and codes.
I personally prefer file manager codes but also like the content manager codes, with new updates content manager has been so much good than before.
So, both of these systems have advantages and dis-advantages.
I personally prefer the content manager, fue to its unlimited nature. it all depends on our site structure.
If you have the download site, you should go for content manager but
if you have forum type site, then all this stuff is not required.
You don't even need any free space at all.

So, what you will prefer?
Let us know. Thanks for reading this tutorial.

How to add CSS code to your Wapka site

How to add CSS code to your Wapka site

some new wapka user requested me, they didn't know how to add css code in Wapka.
They requested me to add a tutorial about this.
Here Just follow my instruction to add css code.

Step 1:

First i talk wapka supported two types of editor to add css code.
In head tags and class.
Here i talk about class because it's easy and safe.

Step 2:

Login your Wapka site.
Go to >Admin Mode>EDIT SITE>WAP2>Classes settings>Add new class

Step 3:

Then you see a box write here something and Click on own elements check box.

Step 4:

Then click continue and you see a box.
Here you write your css code or paste of your code.

Now done.
If you like or faces any problem comment me.

how to add facebook like button to wapka site


how to add facebook like button to your wapka site

We know that facebook is a world no.1 social bookmarking site.
You can increase your site rank by using facebook like widget and also it's help you to increasing your Facebook fan page like.
Now i tell you, How to add beautiful facebook like button code in your favorite wapka site.

How to Add

1. First login to your Wapka site.
2. Click Manage from Site List.
3. Then click Admin mode.
2. Then click ::EDIT SITE(#):: (You can see this at the bottom).
3. Then click WML/XHTML code.
4. Now paste below of the following code into the WML/XHTML Code box.
5. Before pasting replaced
http://cuteaursa.blogspot.com
with your website link or your facebook fan page link. Done. Now enjoy this facebook widget.

simple facebook share button widget for wapka site


facebook share button widge for wapka site

In today’s post, I will be sharing a tutorial on how to add facebook share button to a wapka site.
A facebook share button is like a normal web bookmark tool built with html that allows users to share your wapka site on facebook when clicked.
Having this on your wapka site, will automatically generate some traffic to your wapka site, because when your site users share your site on facebook, facebook users who sees your link can easily click on the link to locate your wapka site.
To add facebook share button
1. Log on
www.wapka.mobi,
2. input your wapka username and password Click on “Admin Mode” and then “Edit Site” Select “WML/Xhtml” and copy paste the highlighted code below into the xhml box provided and save That’s all. Hope it helps. Feel free to share this tutorial.
you may also like these
How To Convert Videos To ASCII Using VLC Media Player on Pc
&
How to Secure your privacy & stop password stealers
&
How to Make Mozilla Firefox Fast

How to Secure your privacy & stop password stealers


How to Secure your privacy and stop password stealers in chrome & internet explorer

Someone said- "safety fisrt!" and i really agree with that guy.
It's important to note that even as we're sometimes blind to it,there are other people who come online in the internet as we do but they don't come to chat of search anything instead they come to deliver malware and viruses which sometimes steals passwords and usernames using cookies.
That's the easy way to explain it to a lay man.
So when they get these information the can use to harm us.
For example,they can use our facebook login details to access our facebook accounts and make a mess of it as well as do so many other things.

HOW TO PREVENT COOKIE STEALERS FROM BYPASSING YOUR FIREWALLS TO GAIN ACCESS TO YOUR PASSWORDS

this now calls for a need to set up a string security system to keep these guys of.
Let me make it short and give you the steps.
To stay safe on net, you should always turn cookies protection on.
On your Google Chrome press, CTRL+SHIFT+P.
On your Internet Explorer, press- CTRL+SHIFT+N.
You can now enjoy your surfing.
Hope you enjoyed it .
share this tutorial with your friends.
we'll post more internet security later!
you may also like these
How To Convert Videos To ASCII Using VLC Media Player on Pc
&
What is a cookie ?
&
How to Make Mozilla Firefox Fast

How To Convert Videos To ASCII Using VLC Media Player on Pc


How To Convert Videos To ASCII Using VLC Media Player on Pc

Converting Video to ASCII using VLC Media Player
Today,we'll talk about the above mentioned topic-Convert any Video to ASCII using VLC Media Player.
By the end of this tut,you can be able to do it on your own!
So,let's get started.
VLC is a video player with a lot of tricks.
While you definitely would be aware about converting videos with it, the feature of converting any video to ASCII is one that is slightly less known.
As ASCII version of movies like Star wars are very popular online, I think this feature of this amazing media player can be used to have lots of fun.
All you need to do is open any video and VLC will automatically display its converted form.
To convert any video in ASCII, just follow the steps given below:
1. Open VLC Media Player.
2.Click on the Tools menu and in the drop down list, click on Preferences at the bottom of the list.
3. Click on Video icon in the left sidebar.
4. Click on the drop down box next to Output.
5. Select "Color ASCII art video output" from the drop down list.
6. Click Save and restart VLC. Older versions of VLC might require you to modify these settings under the Advance tab or All Settings tab.
As VLC runs on a variety of OSs, this trick will work on any PC capable of running this media player.
However, it is interesting to point out that older PCs having poor hardware will slow down and give a stuttered output.
you may also like these
What is a browser cache ?
&
What is a cookie ?
&
How to Make Mozilla Firefox Fast

How to Make Mozilla Firefox Fast


How to Make Mozilla Firefox Fast

Have you noticed your usually speedy Firefox browser slowing down, or even crashing on you?
Unnecessary plugins, extensions, and even browsing data can slow your browser down to a crawl, or make it crash.
Here’s how to fix it.
We’ll show you how to speed up Firefox by disabling plugins and extensions and clearing the browsing data.

Disabling Plugins

Plugins help Firefox manage internet content such as Flash, Silverlight, Java, and Office, and there are probably many installed plugins you don’t need.
Because they can slow down the browser, you can disable ones you are not using.
NOTE: Plugins cannot be deleted or uninstalled, only disabled.
An exception would be a plugin that was installed as part of an extension and you uninstall the extension.
Then, the plugin is automatically removed. To disable a plugin in Firefox, click the Firefox button and select Add-ons from the drop-down menu.firefox add-ons 
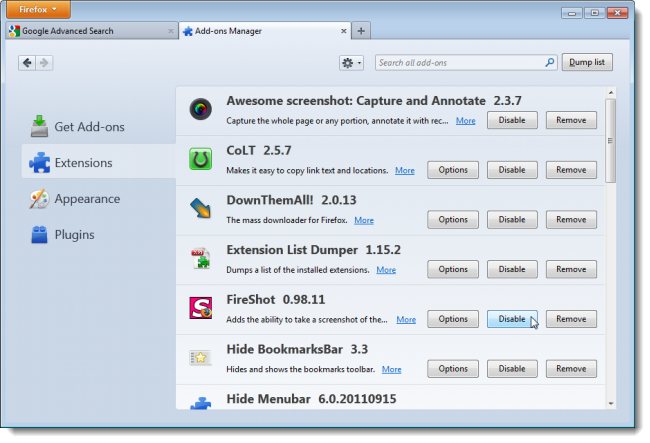
The Add-ons Manager opens on a new tab. Click the Plugins tab on the left side of the tab. For each plugin you want to disable, click the corresponding Disable button.firefox plugin disable 
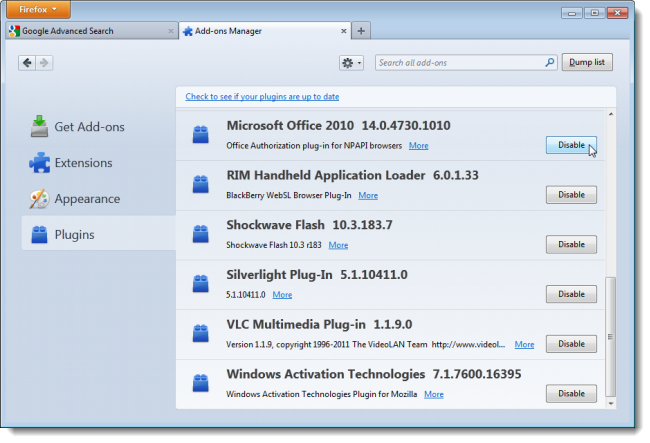
The disabled plugins display grayed out and the Disable button becomes an Enable button you can use to re-enable the plugin, should you want to.
NOTE:
All disabled plugins are moved to the end of the list of plugins.firefox enable plugins 
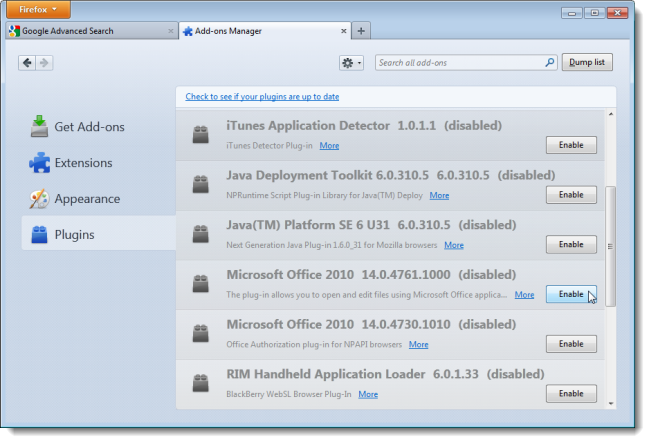
You should be safe disabling almost every plugin except for Flash, which is used on a lot of sites on the web.

Disabling Extensions

You can add all kinds of additional functionality to Firefox through the use of extensions, such as extensions to block
advertisements, download videos, integrate with social networking sites, enhance Firefox features, and even add features available in other browsers.
However, the more extensions you install, the slower Firefox can become.
To speed up Firefox, you can disable extensions without having to uninstall them.
That allows you to easily enable them again if you want to use them.
To disable an extension, click the Extensions tab on the left side of the Add-ons Manager.
If you closed the Add-ons Manager after disabling plugins, open it again as described earlier in this article.
Find the extension you want to disable and click the Disable button to the right of the description.firefox disable extension Most extensions require you to restart Firefox to be disabled. If you get a restart message as shown in the following image, click the Restart now link.restart now 
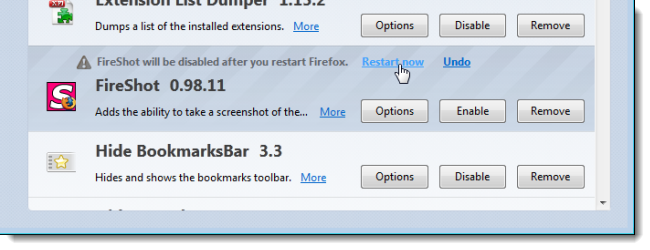
The disabled extensions are grayed out and the Disable buttons become Enable buttons allowing you to re-enable extensions at any time.
Notice that the Option button is not available for disabled extensions.
All the disabled extensions are moved to the end of the extensions list.extensions re-enable

Uninstall Plugins

As mentioned earlier, plugins cannot be manually uninstalled from within Firefox, at least easily.
However, most plugins come with their own uninstallation utilities.
See the plugins article on the Firefox Help site for information on uninstalling various common plugins.
If an uninstaller program doesn’t work for a particular plugin, there is a way to manually uninstall a plugin.

Remove Extensions

If you want to completely remove an extension, open the Add-ons Manager, if it is not already open, click the Extensions tab, and find the extension you want to remove in the list. Click the Remove button. If the restart message displays above the extension title, click the Restart now link to complete the removal process.
NOTE: You can remove an extension even when it’s disabled.remove extension

Clear Browsing Data

if you don't know,see How to Clear mozilla firefox all Browsing Data

What is a cookie ?


What is a cookie ?

Cookies are small files that websites put on your computer hard disk drive when you first visit.
Think of a cookie as an identification card that's uniquely yours.
Its job is to notify the site when you've returned.
While it is possible to misuse a cookie in cases where there is personal data in it, cookies by themselves are not malicious.
Many websites, including Microsoft's, use cookies.
Cookies tell us how often you visit pages, which helps us learn what information interests you.
In this way, we can give you more of the content you like and less of the content you don't.
Cookies can help you be more efficient. Have you ever put something in a virtual shopping cart in an online store and then returned a few days later to find that the item is still there?
That's an example of cookies at work.
Cookies let you store preferences and user names, register products and services, and personalize pages.
But if you never register or leave personal information at a site, then the server only knows that someone with your cookie has returned to the website.
It doesn't know anything else.
you may also like these
How to Clear mozilla firefox all Browsing Data
&
How to Automatically Shut Down a Windows computer
&
What is a browser cache ?

What is a browser cache ?


What is a browser cache ?

A cache is a repository for stored data that is used to expedite the process of retrieving data.
There are several types of caches, including webpage caches, hardware caches, software caches and memory caches.
Caches are used to speed up a process so that data does not have to be recomputed or fetched from its original location and, therefore, saves time.
The greater the requests that can be served from the cache, the quicker system performance becomes.
A cache hit is when a program checks the cache for previously stored information and finds it.
A cache miss is when the data is not found within the cache and the program must look to a larger, slower memory source.
Computers can have several caches: the L1 cache is built into the computer processor’s chip, the L2 cache is built onto the motherboard and the L3 cache is just the L2 cache on a computer that has two caches built into the microprocessor.
Internet browsers use caching to store HTML web pages by storing a copy of visited pages and then using that copy to render when you re-visit that page.
If the date on the page is the same date as the previously stored copy, then the computer uses the one on your hard drive rather than re-downloading it from the internet.
you may also like these
How to Clear mozilla firefox all Browsing Data
&
How to Automatically Shut Down a Windows computer
&
How To Use WhatsApp On Your Pc

How to Clear mozilla firefox all Browsing Data


how to Mozilla Firefox Clear all Browsing Data like cache,cookie,search,passwords and forms

Firefox keeps track of sites you’ve visited, files you’ve downloaded, searches, form data, cookies, and more.
All this data collects in the history database, and that database can get very large.
There are several ways to clear your browsing data from the database.

Clear All Your Browsing Data

To clear your browsing data for all of your browsing activity for a certain amount of time, click the Firefox button and select History | Clear Recent History from the drop-down menu.firefox recent history On the Clear Recent History dialog box click the down arrow to the left of Details.firefox recent history detail 
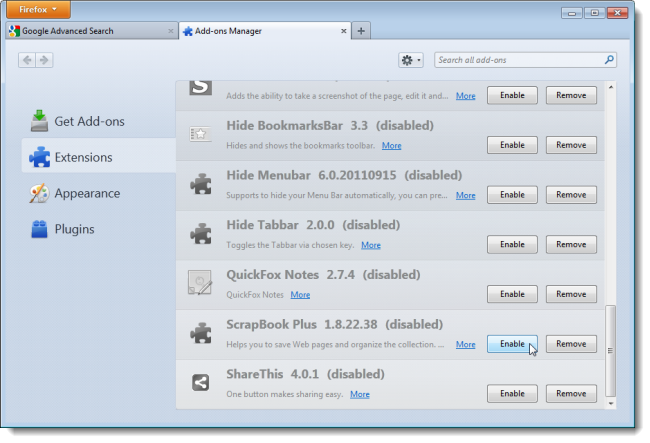
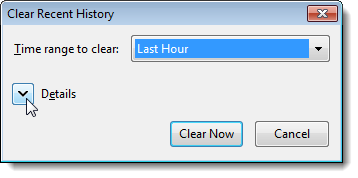
Select the check boxes for the items you want to clear. Select a time range from the drop-down list at the top of the dialog box.clear recent histroy dialog If you select Everything, a warning message displays telling you that the action cannot be undone.
Be sure you want to clear your entire history of browsing data before clicking Clear Now to clear it.firefox click clear now

Clear Browsing Data for a Single Website

If you want to keep browsing data for some websites and not others, you can selectively choose to clear browsing data for specific websites.
To do this, click the Firefox button and select History | Show All History from the drop-down menu.firefox show all history The Library dialog box displays. In the tree in the left pane, click the time frame that corresponds to when you visited the website for which you want to clear the history.
All the websites you visited during that time frame display in a list in the right pane.
Right-click on the desired website in the list and select Forget About This Site from the popup menu.
If you have a long list of sites, you can use the Search History box to find the desired website.
NOTE:
There is no confirmation for this action, so be sure you want to delete the browsing data for a website before you do it.firefox forget about this site 
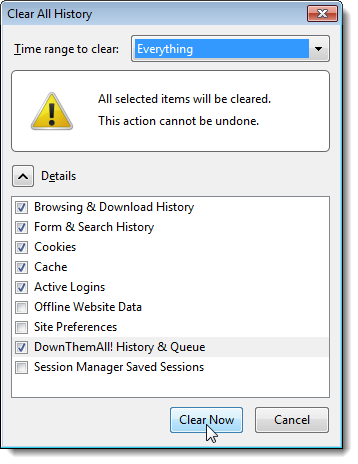
To close the Library dialog box, click the X button in the upper, right corner.firefox close history

Clear Browsing Data Automatically When Firefox Closes

To clear your browsing data automatically every time you close Firefox, click the Firefox button and select Options from the drop-down menu.
NOTE:
It doesn’t matter whether you select Options on the main menu or the Options submenu.firefox select option 
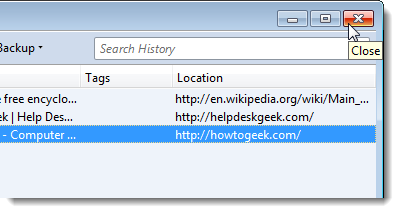
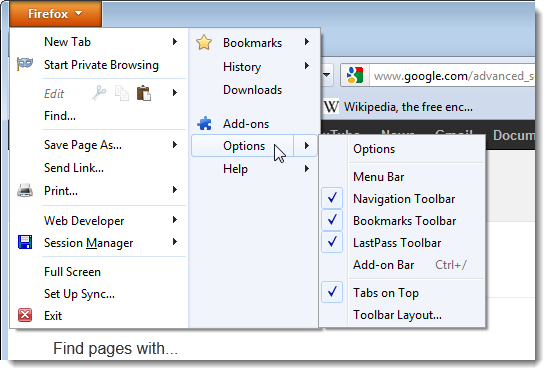
On the Options dialog box, click the Privacy button on the toolbar.
Select Use custom settings for history from the Firefox will drop-down list in the History section.firefox use custom setting history Additional options display. Select the Clear history when Firefox closes check box so there is a check mark in the box.
Click the Settings button.clear history when firefox close 
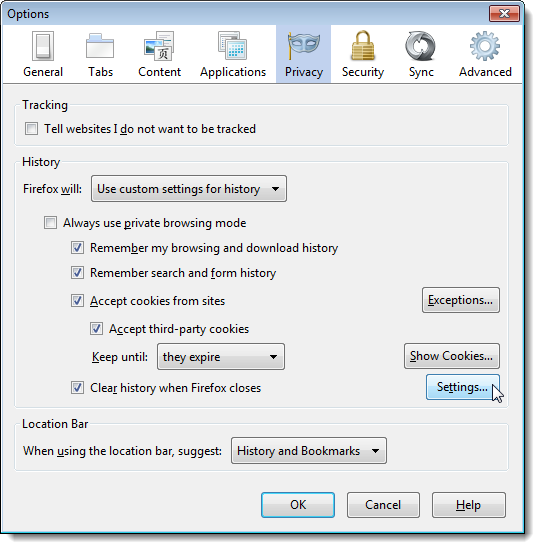
On the Settings for Clearing History dialog box, select the items you want to clear when you close Firefox. Click OK. You are returned to the Options dialog box. Click OK on that dialog to accept your changes.firefox setting for clear history when close
you may also like these
How to Automatically Shut Down a Windows computer
&
How To Use WhatsApp On Your Pc
&
What is 301,302,403 and 404 Error ?

How to Automatically Shut Down a Windows computer


How to Automatically Shut Down a Windows computer

Shutting down a Windows PC is as easy as clicking a couple of buttons.
But if you have a habit of working late nights, then you might have the tendency to forget to shut down your computer after use.
To avoid this, you can quickly configure your Windows computer to shut down automatically at night when it is not in use,
i.e., if you are actually using the PC, the system won’t shut down.
Here is how you can do so.

Configure Automatic Shutdown

To automatically shut down your Windows computer at night, we are going to use the regular “Task Scheduler.”
To open the Task Scheduler, press the Start button and search for and click on the option “Task Scheduler.”task scheduler.png 
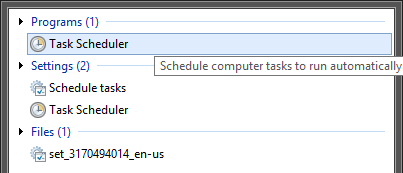
Once the “Task Scheduler” has been opened, select “Create Basic Task” from the “Actions” panel located on the right side.create basic task 
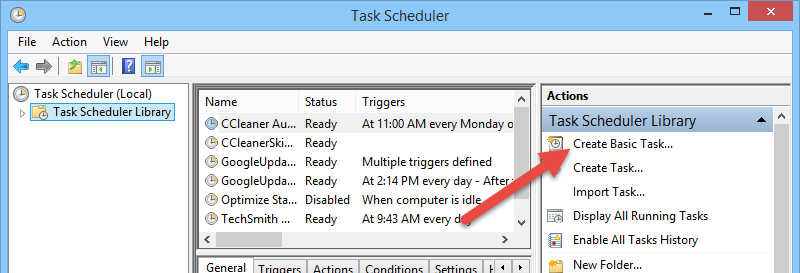
The above action will open the task creation wizard. Here enter a meaningful name and description of the task you are going to create, then click on the “Next” button. That way, you can easily find the task when needed.task creation wizard 
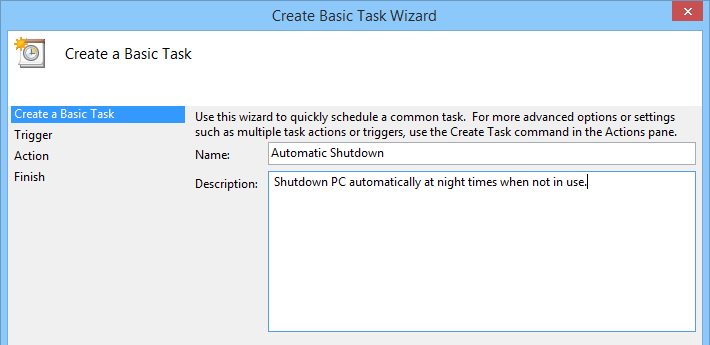
Here in this screen, select the radio button “Daily” and click on the “Next” button to continue.task button daily 
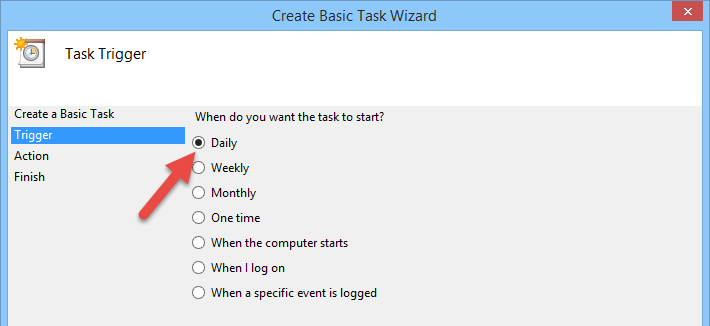
Now enter the starting date and time. Also, make sure that you are choosing for the task to reoccur every day.task starting date and time 
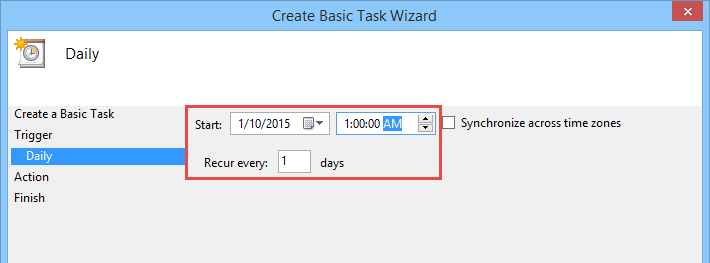
Since we are going to shut down the system, select the radio button “Start a program” and click on the “Next” button to continue.task start program 
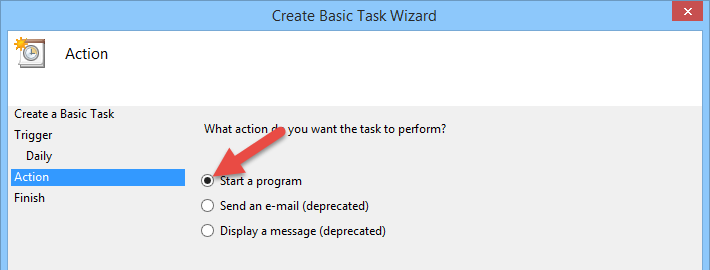
Now enter “shutdown” in the program or script field and as the argument, enter /S. You can also enter /F as the second argument which forces your Windows computer to shut down. This is helpful when you have programs which may conflict with the shutdown process. Make sure that you add a space between the two arguments.task /f /s with space 
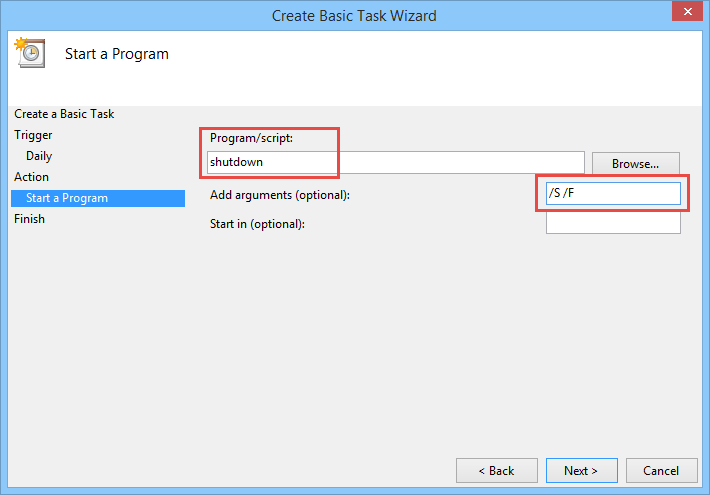
Once you are done with the configuration, just go through the summary, and if everything is fine, click on the “Finish” button. You are not yet finished, though.task finish 
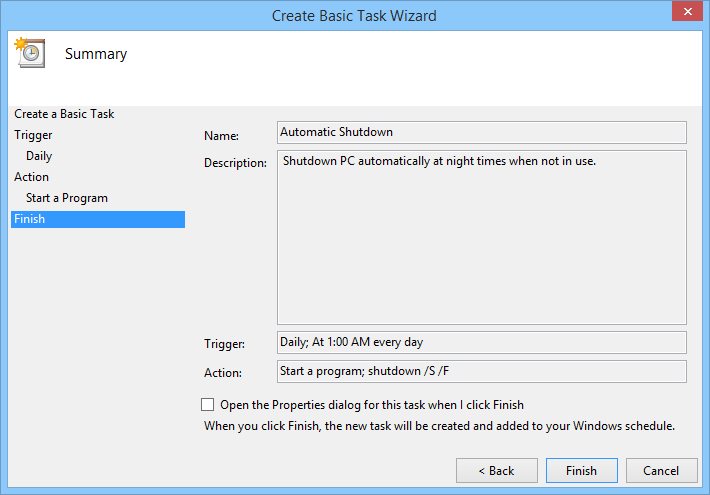
Back to the main window, find the task you just created, right-click on it and select the option “Properties.”task properties 
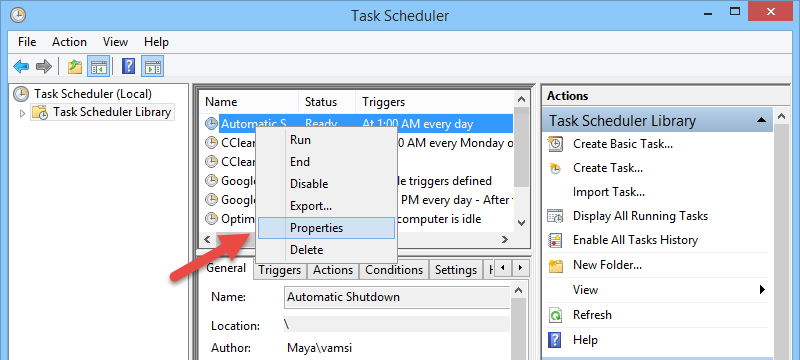
The above action will open the task properties window. Here in the “General” section, select the checkbox “Run with highest privileges.”task highest privileges Navigate to the “Conditions” tab and select all three check boxes: “Start the task only if the computer is idle for,” “Stop if the computer ceases to be idle,” and “Restart if the idle state resumes.” Also, select the time as “30 minutes” in both the fields.task select three boxes 
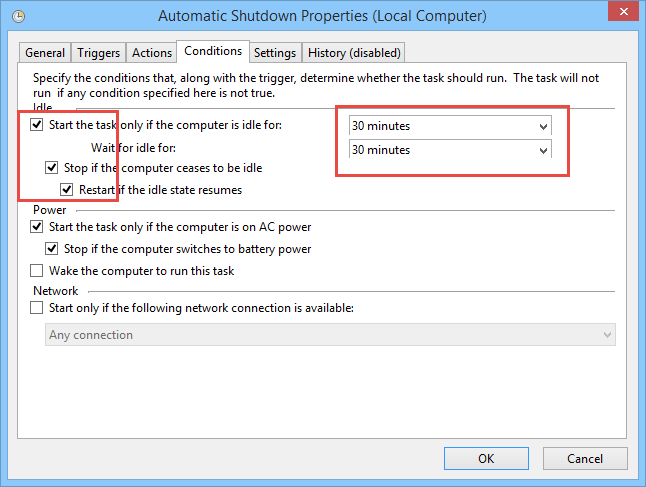
Once you are done, navigate to the “Settings” tab. Here select the check boxes “Run task as soon as possible after a scheduled start is missed” and “If the task fails, start every.” Now, enter the time as “30 minutes” and the number of attempts as “3.” Also, change the time of “Stop the task if it runs longer than” to one hour.task setting check boxes 
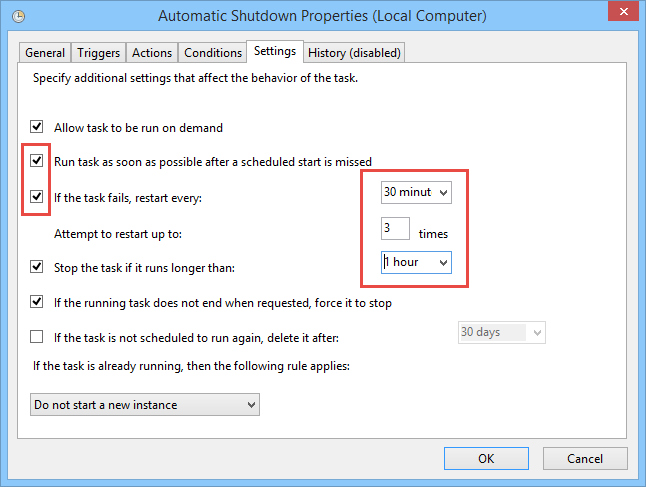
Once you are done with settings, click on the “Ok” button to save the changes. With this, you have successfully configured the automatic shutdown at night. If you ever need to, you can always change the settings as required from Task Scheduler’s main window. That’s all there is to do, and it is that simple to use task scheduler to configure automatic shutdown at night when not in use.
you may also like these
How to get quality organic traffic from Google+ for your website/blog
&
How To Use WhatsApp On Your Pc

How To Use WhatsApp On Your Pc


How To Use WhatsApp On Your Pc

Tired of only being able to access your WhatsApp conversations on your phone?
Start using WhatsApp Web.
Earlier this week Facebook-owned WhatsApp announced WhatsApp Web .
The new service makes it possible for a user to link a website accessible only through Google's Chrome browser to his or her WhatsApp account.
In doing so, WhatsApp conversations will sync between the mobile device and desktop.
As long as you're signed in, your conversations will sync -- even when you're away from the computer, or on a cellular connection (as opposed to the same Wi-Fi network as your computer).
The process for linking your WhatsApp account to your computer is streamlined, and easy enough for Grandma to follow.
First, download Chrome if you don't already have it installed on your computer.
Next, visit https://web.whatsapp.com/ in Chrome.
Follow the instructions to pull up the WhatsApp Web QR code scanner on your mobile device.
The method for launching this section of the app is a different based on the platform you're using, but directions are listed just under the QR code.
Scan the QR code and watch as your conversations magically appear in your browser.
iOS users will notice directions to connect your iPhone are missing from the list of supported devices.
WhatsApp says the reason is due to "Apple platform limitations." The layout of WhatsApp Web should mirror the mobile experience, just on a larger scale.
You can still send emoji, photos, voice notes, view your contact list and so forth.
To receive alerts of incoming messages on your computer, click on Allow (top- right corner of Chrome) when prompted.
You'll need to approve access to other aspects of your computer in a similar fashion as you attempt to send photos or record voice memos.
Going forward, anyone who has access to your computer will be able to pull up your WhatsApp conversations as long as you remain logged in.
If your computer is password protected, that's probably not a big deal.
But when using WhatsApp Web from a public computer, you'll want to sign out when you're finished.
You can do that by clicking on the three-dot menu icon and selecting Log out.
Have you used WhatsApp Web yet ?
If so, what are your thoughts ?
you may also like these
&
How to get quality organic traffic from Google+ for your website/blog
&
What is 301,302,403 and 404 Error ?
&
How to boost your blog/website traffic from Reddit Simple

What is 301,302,403 and 404 Error ?


What is 301,302,403 and 404 Error ?

I Am posting this trend today so as to answer the unanswered question in the Hearts of many...
1. 301 Moved Permanently:
This and all future requests should be directed to the given URI.
2. 302 Found: Moved Temporarily:
This is an example of industry practice contradicting the standard.
3. 403 Forbidden:
The request was a valid request, but the server is refusing to respond to it.
4. 404 Not Found:
The requested resource could not be found but may be available again in the future.
you may also like these
&
How to boost your blog/website traffic from Reddit Simple
&
How to get quality organic traffic from Google+ for your website/blog
&
How to submit your blog/website to Alexa

How to get quality organic traffic from Google+ for your website/blog


How to get quality organic traffic from Google+ for your website/blog

Google+ is another hidden source of Quality organic traffic for webmasters so today, i'll drop some useful tips on how to tap traffic from this fast growing google-community-site. Read on

1. Create a Complete Profile or Page

If your blog can be identified as a business or brand, then create a Google+ Page for it.
If not, use your personal Google+ profile to connect with your blog audience.
The first step is to create a comprehensive profile or page that fully describes who you are, what expertise you bring to the table, how to find your blog, what your blog is about, and what makes it special.

2. Connect with People

Once you've created your Google+ profile or page, you need to start connecting with other Google+ members.
Search for people you know first.
Then look through the people they follow to find more interesting people to follow.
As you spend time on blogs and other social web destinations, look for links to connect with interesting people on Google+.

3. Create Circles

Next, you should create circles to categorize your Google+ connections and then place people into appropriate circles.
For example, create circles for your blog readers, your blog post sources, people who influence your target audience, people who can help you promote your blog or publicize it, and so on.

4. Send Targeted Messages

As you publish updates to Google+, you can choose which circles to share those updates with so the right audiences get the right messages.
This is a great feature that ensures people don't receive the updates you don't want them to see.

5. Publish Interesting Content

Don't just publish links to your blog posts over and over.
That's boring and will be viewed as excessive self-promotion.
Your Google+ stream of updates should be interesting and meaningful to your audience, not spammy.
Therefore, publish and share interesting updates and links that your target audience will find value in and appreciate seeing.

6. Create Sparks

Create sparks to track keywords related to your blog topic and jump into relevant conversations.
Share content and updates that other people publish related to your blog topic that your audience is likely to enjoy, and look for new people to connect with on Google+ and blogs to follow outside of Google+.

7. Host Hangouts

Google+ hangouts are video chats between up to 10 Google+ members. You can host a hangout and promote it as a small virtual webinar or tuturial session. Think of how you can tie a video chat session with your blog topic and what kind of valuable information you could share in such a session.
Then promote it on your blog as a special event!

8. Host Huddles

Instead of holding a tweet chat on Twitter, you can hold a Google+ huddle, which is a text chat between Google+ members.
For example you can promote your Google+ huddle on your blog as a question and answer session between a small group!

9. Integrate and Cross-Promote

Use social media icons, Facebook social plugins, Twitter widgets, and so on to integrate your blog marketing efforts and cross-promote your content.
Give people as many ways to find your blog and interact with you as possible.

10. Be Active

Update your Google+ stream frequently with new content, and make sure you spend time commenting on other members' updates as well. The more active you are, the more likely people are to remember who you are, recognize what your blog is about, and click through to read your posts!
you may also like these
&
How to boost your blog/website traffic from Reddit Simple
&
How to add .html extention to wordPress blog url
&
How to submit your blog/website to Alexa

How to boost your blog/website traffic from Reddit Simple


How to boost your blog/website traffic from Reddit

1: Firstly Open
Reddit.com
2: Click On SignUp (If you have Reddit account then Login)
3: Login Your Account
4: After That Click On “Submit a new link”
5: Write The Title in Title Box
6: Paste The Article URL in “URL”
7: Now Choose A Subreddit (What is the Niche Of Aticle) Like SEO,Traffic, etc
8: After that click on Submit Button Its done! After some time you will find the
best results from Reddit.
This is all about How to Get Boost Traffic from Reddit.
But in last i would like to explain 1 thing about Reddit. If you will submit a article in Reddit then you can submit a Article on 1 subreddit in a day.
In last if you like this article then don’t forget to share this with beginners.
you may also like these
&
10 top tips to drive traffic with Linkedin
&
How to add .html extention to wordPress blog url
&
How to submit your blog/website to Alexa

How to submit your blog/website to Alexa


How to submit your blog/website to Alexa.com

I am gonna take you through the steps of claiming your blog/website @ALEXA.
It's simple just follow these steps»
1: Open
www.alexa.com
2: Enter Your Site In Search Box
3: Click On Find Button
Claim and Submit Website to Alexa
4: After That Click On “Edit Site Info”
5: Now You Will See a Pup-Up Page then Click On “Claim This Site”
Claim and Submit Website to Alexa
6: After that Select Any Option And Do Complete The Processor
7: Click On Verify Button
Now Its Done!!!!

Submit Your Details

1: Site Title – Write a best title of your site here.
2: Site Description – Here write a best description of your site.
3: Site Owner – Write your name here.
4: Address – Enter your correct address here.
5: City – Enter your city name here.
6: State – Enter your state name here.
7: Postal/Zip Code – Enter your postal code or zip code here.
8: Country – Enter your country name here.
9: Public Mail – Enter your mail id.
10: Select The Country For Your Work – Here select any country for your work.
11: Save Changes – Now click on save changes.
DONE!
you may also like these
&
10 top tips to drive traffic with Linkedin
&
How to add .html extention to wordPress blog url
&
Differences between A, CNAME, ALIAS and URL records

How to add .html extention to wordPress blog url


How to add .html extention to wordPress blog url

Reasons to add .html extension to the end of a wordpress Blog url.
1. For fast indexing
2. For Better SEO
3. To speed up site load time
4.To enable a printable and save-able Css for your Blog
5. Lastly for the fun :-)

How to add .html at the end of a wordpress url

Understanding the Permalink structure
/%year%
Means Domain url turns to yearly naming e.g
youblog.com/2010,
yourblog.com/2011 etc.
/%monthnum%
Domain url turns monthly naming e.g
yourblog.com/04,
youblog.com/05
/%postname%/
Domain url turns postname naming e.g
yourblog.com/how-to-add-

How to add .html to the end of a wordPress url

Goto>>
Dashboard>>
settings>>
permalinks>>
custom>>
clear the box and add the following
/%year%/%monthnum%/%postname%/.html
Note: a site url link should not be changed to .php extension due to some rank factors.
you may also like these
1
10 top tips to drive traffic with Linkedin
2
What is a CNAME record?
3
Differences between A, CNAME, ALIAS and URL records

10 top tips to drive traffic with Linkedin


10 top tips to drive traffic with Linkedin

Below are the 10 top tips to drive traffic with Linkedin. make sure you read and digest them,then apply them.
1. Complete Your Profile
2. Build Your Connections
3. Be Active
4. Join Targeted Groups
5. Create a Group
6. Engage with Your Network
7. Write Engaging and Interesting Content
8. Share Blog Post with Individuals
9. Follow LinkedIn Influencers
10. LinkedIn Share Button
you may also like these
1
What Is Propagation ?
2
What is a CNAME record?
3
Differences between A, CNAME, ALIAS and URL records

Differences between A, CNAME, ALIAS and URL records


A,CNAME,ALIASand URL records are all possible solutions to point a host name (name here after) to your site.
However, they have some small differences that affect how the client will reach your site.
Before going further into the details, it’s important to know that A and CNAME records are standard DNS records, whilst ALIAS and URL records are custom DNS records provided by DNSimple.
Both of them are translated internally into A records to ensure compatibility with the DNS protocol.

Understanding the differences

Here’s the main differences:
*.The A record maps a name to one or more IP addresses, when the IP are known and stable.
*.The CNAME record maps a name to another name. It should only be used when there are no other records on that name.
*.The ALIAS record maps a name to another name, but in turns it can coexist with other records on that name.
*.The URL record redirects the name to the target name using the HTTP 301 status code.
Some important rules to keep in mind:
*.The A,CNAME,ALIAS records causes a name to resolve to an IP. Vice-versa, the URL record redirects the name to a destination.
The URL record is simple and effective way to apply a redirect for a name to another name, for example to redirect
www.example.com
to
example.com.
*.The A name must resolve to an IP,
the CNAME and ALIAS record must point to a name.

Which one to use

Understanding the difference between the A name and the CNAME records will help you to decide.
The general rule is:
*.use an A record if you manage what IP addresses are assigned to a particular machine or if the IP are fixed (this is the most common case)
*.use a CNAME record if you want to alias a name to another name, and you don’t need other records (such as MX records for emails) for the same name
*.use an ALIAS record if you are trying to alias the root domain (apex zone) or if you need other records for the same name
*.use the URLrecord if you want the name to redirect (change address) instead of resolving to a destination. You should never use a CNAME record for your root domain name (i.e. example.com).

What is a CNAME record?


What is a CNAME record ?

CNAME stands for Canonical Name. CNAME records can be used to alias one name to another.
For example, if you have a server where you keep all of your documents online, it might normally be accessed through
docs.example.com.
You may also want to access it through
documents.example.com.
One way to make this possible is to add a CNAME record that points
documents.example.com
to
docs.example.com.
When someone visits
documents.example.com
they will see the exact same content as
docs.example.com
you may also like these
1
Differences between A, CNAME, ALIAS and URL records
2
how to add custom author profile in blogger theme
3
How to Add Facebook Share Button to Blogger theme"

What Is Propagation ?


What Is Propagation

Registration of a new domain name, changes to the domain name servers or changes to Advanced DNS records require an update to the information stored across the Internet.
This update process is called propagation and occurs when domain name servers (DNS) on the Internet world-wide update their records (DNS tables) to reflect any updates to domain names and IP addresses.
The propagation process must be completed for your changes to be recognized throughout the Internet.
DNS propagation takes approximately 12-36 hours.
you may also like these
1
what is dns and how does it work
2
how to add custom author profile in blogger theme
3
what is page authority

what is dns and how does it work


What is dns and how does it works ?

Domain Name Servers (DNS) are the Internet's equivalent of a phone book.
They maintain a directory of domain names and translate them to Internet Protocol (IP) addresses.
This is necessary because, although domain names are easy for people to remember, computers or machines, access websites based on IP addresses.
Information from all the domain name servers across the Internet are gathered together and housed at the Central Registry.
Host companies and Internet Service Providers interact with the Central Registry on a regular schedule to get updated DNS information.
When you type in a web address, e.g.,
www.yourdomain.com, your Internet Service Provider views the DNS associated with the domain name, translates it into a machine friendly IP address (for example
216.168.224.70
is the IP for yourdomain.com) and directs your Internet connection to the correct website.
After you register a new domain name or when you update the DNS servers on your domain name, it usually takes about 12-36 hours for the domain name servers world-wide to be updated and able to access the information.
This 36-hour period is referred to as propagation.
you may also like these
1
how to add custom author profile in blogger theme
2
what is page authority
3
what is domain authority

how to add custom author profile in blogger theme


how to add custom author profile in blogger

You had observed that at almost every professional blog have a box which contain the brief bio of blog author.
The picture of the author, his Facebook and Twitter profile links are also there to get more info about the author.
This is a widget and we can easily add it in blogger.
Author box make our website/blog beautiful.
In this article I will show you how you can add Author box in your blog.
Here is the guide.You have to follow some steps to add Author box.

Step#1

1. Login to Blogger.com >>Template>> Edit HTML Press Ctrl+F to find this code 2.Copy the following code and paste it just above

Step#2

I think you have done above step carefully. Now press Ctrl+F to search for this code Copy the following code and paste it after the above code. Now Replace Address of image with the URL of your own image (Add the image in Picasa album and copy the URL and paste here.
You 're done. Hopefully this article will help you to add an Author box widget in your blog.
Happy blogging .If you are facing any difficulty to implement this let me know comment box.
you may also like these
1
How to Add Facebook Share Button to Blogger theme
2
How To Add Facebook Like Button to Blogger theme

what is page authority


what is page authority ?

Online business marketing depends on the implementation of proper tools in search engine optimization. One of the greatest ways to check your site’s progress is by knowing your page authority.
Page authority is an SEO term used to describe the probability that a specific page from your site will be found on a search engine.
Page authority is based on a logarithmic scale from 0 to 100 and deals with the relevance of information and links within site pages to one another.
Higher page authority means greater chances of your page showing up on search engines, and that your page will be placed closer to the top of the search results. Note that page authority is related to the pages within sites, not the site itself.

How Can I Improve My Page Authority?

With search engine algorithms constantly changing, everyone wants to know the secret to getting their page ranked the highest! However, the truth is that there is no secret.
Google has released thousands of patents on the algorithm that help tell us how the ranking works.
SEO experts have searched for a pattern in how sites can gain more page authority and become ranked higher, and have dug into the depths of Google’s process to determine the keys to successfully increase your page authority. A few of the factors which are thought to influence the ranking include:

Fresh, usable content

Search engine optimization was at one point thought to be all about the keywords.
Websites would flood their pages with relevant keywords to increase their ranking on search engines.
The downside was that the content became less user-friendly, and more of a nuisance than anything.
Over the years, Google has striven to weed-out these sites and increase the ranking of sites with fresh content that would be applicable for browsers.
As SEO experts previously said, content is king. Search engines now tend to rank sites higher with content that is:
*.new and interesting
*.updated frequently
*.detailed, relevant and useful
*.qualified
*.easy and fun to read

Links to your pages

Having great information on your pages not only attracts new browsers to your site and assures returning browsers, but it can also be beneficial in building your reputation as others link to your page.
Creating links to your page from other sites is a great way to ramp up your page authority.
These links raise awareness for your site, and when used properly can increase traffic to your page.
Having websites owned by others link to your page isn’t always the easiest;
however, remembering to create useful information can improve your chances of someone referencing your page.

Images

Text isn’t the only important factor in SEO! With search engine capabilities to browse for images, these graphics are more important than ever. But how can people find your site through images?
Incorporate related images into your pages and include descriptive ALT text so that these images can be found on search engines.
More traffic to the image will generate more traffic to your site.
While other factors continue to play a role in page authority, including these few simple ideas will help get you started in the right direction.
You may also like this
1
How To Add Facebook Like Button to Blogger theme
2
How to Add Facebook Share Button to Blogger theme

what is domain authority


what is domain authority

Domain authority is a measure of the power of a domain name and is one of many search engine ranking factors. Domain authority is based on three factors:
Age, Popularity, and Size.
The search engines want to provide users with website results that can be trusted.
New websites are popping up every day and many don’t last for various reasons.
Domain age is an indicator of trust because it proves to the search engines that the website has longevity. If the website owner has maintained registration of a website consistently and has generated an increase in traffic to that domain over time, the search engines conclude that it must serve a purpose and be a trusted source.
Domain popularity is measured in part by the number of inbound links from quality sites that a domain has. Inbound links to a domain are a signal that that website has useful information that is worth sharing. This is why a white hat SEO link building campaign is so important. Tactics such as blogging and blog commenting, press release distribution, directory and profile submission, article marketing, and social media help to build inbound links to a domain and generate traffic over time. The size of a website on a domain contributes towards its authority because the number of pages that exists on a domain correlate with the amount of content that can generate inbound links. A larger website with quality content on each page will have more inbound links than a smaller website.
Domain authority, or domain trust, is important because it will help new pages of content (including blog posts) get indexed more quickly and have a better chance of ranking prominently in the search results.
you may also like this what is page authority

How to Configure Windows Firewall in Windows 8/7

A firewall is software or hardware that checks information coming from the Internet or a network, and then either blocks it or allows it to pass through to your computer,
depending on your firewall settings. A firewall can help prevent hackers or malicious software from gaining access to your computer through a network or the Internet.
A firewall can also help stop your computer from sending malicious software to other computers.

Configure Windows Firewall

You can customize most settings of your Windows Firewall through left pane of the Firewall applet in Control Panel. win7 firewall

1. Turn on Windows Firewall

This setting is selected by default. When Windows Firewall is on, most programs are blocked from communicating through the firewall. If you want to allow a program to communicate through the firewall, you can add it to the list of allowed programs. For example, you might not be able to send photos in an instant message until you add the instant messaging program to the list of allowed programs. To add a program to the list, see Allow a program to communicate through Windows Firewall.

2. Block all incoming firewall connections, including those in the list of allowed programs

This setting blocks all unsolicited attempts to connect to your computer. Use this setting when you need maximum protection for your computer, such as when you connect to a public network in a hotel or airport, or when a computer worm is spreading over the Internet. With this setting, you are not notified when Windows Firewall blocks programs, and programs in the list of allowed programs are ignored. When you block all incoming connections, you can still view most webpages, send and receive e-mail, and send and receive instant messages.

3. Turn off Windows Firewall

Avoid using this setting unless you have another firewall running on your computer. Turning off Windows Firewall might make your computer more vulnerable to damage from hackers and malicious software.

4. Allow a program to communicate through Windows Firewall

By default, most programs are blocked by Windows Firewall to help make your computer more secure. To work properly, some programs might require you to allow them to communicate through the firewall. Here’s how to do that:
Click Allow a program or feature through Windows Firewall. If you are prompted for an administrator password or confirmation, type the password or provide confirmation.
Click Enable all controls. If you are prompted for an administrator password or confirmation, type the password or provide confirmation.
Select the check box next to the program you want to allow, select the network location types you want to allow communication on, and then click OK.

5. How to open a port in Windows Firewall

If Windows Firewall is blocking a program and you want to allow that program to communicate through the firewall, you can usually do that by selecting the program in the list of allowed programs (also called the exceptions list) in Windows Firewall. To learn how to do this, see Allow a program to communicate through Windows Firewall.
However, if the program isn’t listed, you might need to open a port. For example, to play a multiplayer game with friends online, you might need to open a port for the game so that the firewall allows the game information to reach your computer. A port stays open all the time, so be sure to close ports that you don’t need anymore. Click to open Windows Firewall. In the left pane, click Advanced settings. advance seting 
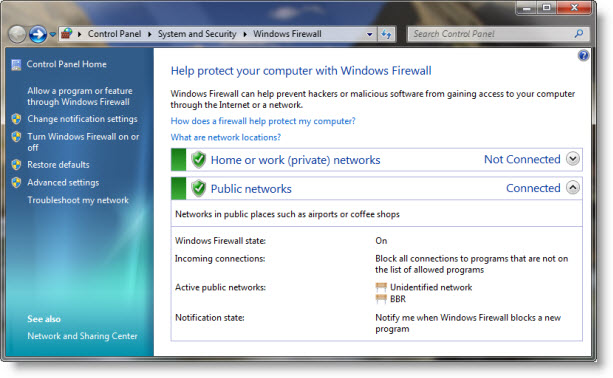
In the Windows Firewall with Advanced Security dialog box, in the left pane, click Inbound Rules, and then, in the right pane, click New Rule. all rules 
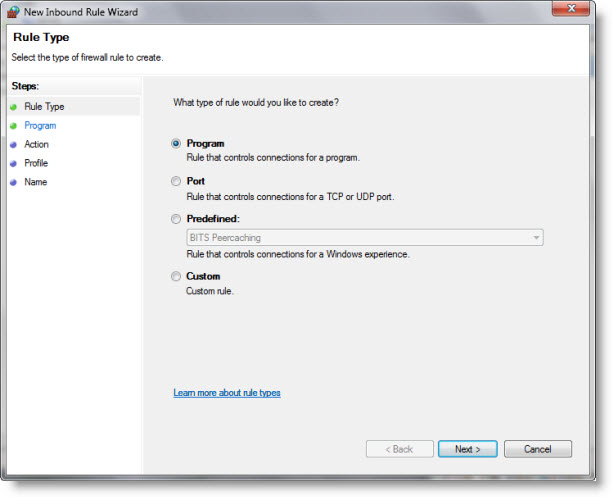
Next, follow the instructions on your screen to its logical conclusion. You definitely want to also check out Manage Windows 7/8 Firewall using Firewall Control Panel application, Netsh utility, Group Policy Object Editor, etc.

How to Manage Windows Firewall in Windows 7/8


The Windows Firewall builds up on and polishes further the already improved Vista firewall. It brings out some of its advanced features out into the open.
While we have already discussed in a little more detail, how to configure the Windows firewall, a few of the changes in Windows 8/7 firewall are touched upon here in brief.

Manage Windows Firewall

Windows 7/8 now allows you to access the advanced settings, including configuration of filtering for outbound connections, through its Control Panel.
Windows 7, now gives you three choices – public network, home network or work network, unlike Vista, which gave you only 2 choices to choose whether you are on a public or private network.
By default the Windows 7 firewall blocks connections to programs that are not on the list of allowed programs.
With all network types, it now allows you to configure the settings for each network type separately. This is what is referred to as Multiple Active Firewall Profiles.
Most would just prefer to have the Windows 7 firewall set to its default and forget about it. The default settings are good enough. Those who want to fine tune it can manage the Windows 7 firewall in the following ways:

1)Windows Firewall Control Panel application.

This is the simplest one and good enough for routine tasks. window 7 firewall 
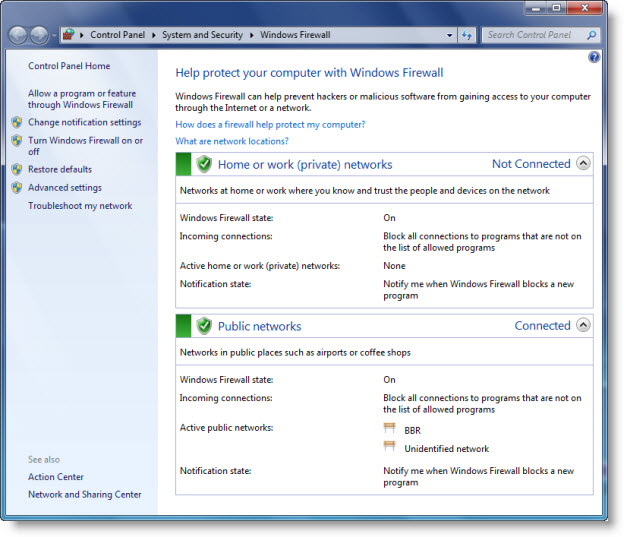
It is the simplest and the least capable. But with it you can complete routine tasks, such as allowing a program through it or blocking all incoming connections. This Technet link true will help you get started .

2)Windows Firewall – Advanced Security.

This one is a snap-in and predefined console for Microsoft Management Console, offers much more granular control over rules, exceptions, and profiles. You can access it through the Control panel app too.

3)The Netsh utility

(in particular, its Firewall and Advfirewall contexts) lets you make firewall settings from a Command Prompt window or a batch program.

4)Group Policy Object Editor

(available only in select editions) incorporates the Windows Firewall With Advanced Security snap-in (under Computer Configuration\Windows Settings\Security Settings\Windows Firewall With Advanced Security). In addition, Windows Firewall can be managed with a number of policies, which can be found in Computer Configuration \ Administrative Templates \ Network \ Network Connections \ Windows Firewall. Incidentally, nearly a total 0f over 3000 settings can be configured through Group Policy Editor (gpedit.msc). However, Group Security Policy is not included in Windows Home Edition.
these links will interest you
1
How to install Android application on Windows computer
2
How to Block or Open a port in Windows 8 Firewall
3
10 big reason for Banned from Google AdSense

How to Block or Open a port in Windows 8 Firewall

how to Block or Open a port in Windows 8 Firewall

According to your needs, you can configure Windows 8 Firewall settings (block or open port in Windows 7 or Windows 8 firewall) and restore defaults if you are unsatisfied with the default Windows Firewall settings.
However for this, you need to get to the advanced settings of firewall.
This is simple, simply open up the control panel and in its search box type –Firewall. Then open Firewall and click on its ‘Advanced Settings’ link.
We have already see how to manage Windows firewall and how to configure Windows Firewall.
In this post we will see in detail how to block or open a port in Windows 8 firewall.

Block port in Windows Firewall

When in the ‘Advanced Settings’ of Windows 8 firewall, click the Advanced settings link in the left-hand pane on the firewall main dialog. This will bring up the Windows Firewall with Advanced Security window. firewall advanced settings 
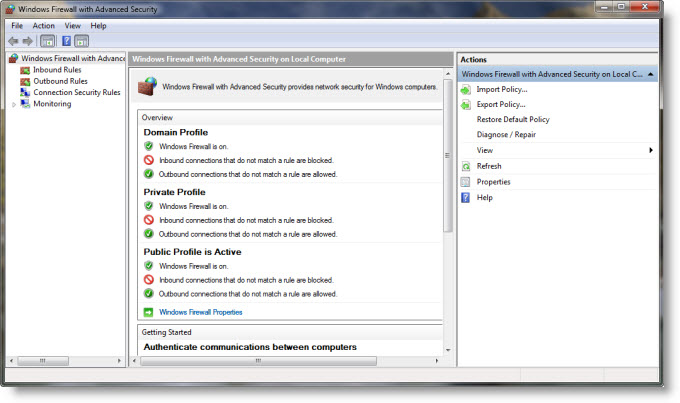
Now, if you see the firewall window shows a list of rules in the left side. From the list, select Inbound Rules to display the inbound rules section. inbound rules 
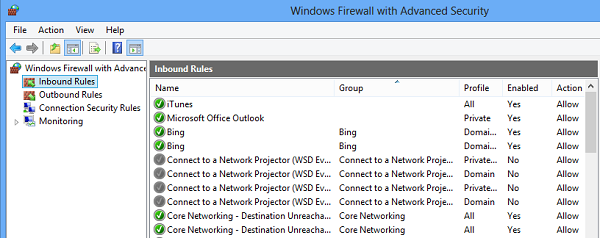
Then, from the right-pane select the ‘New Rule’ option. firewall new rule 
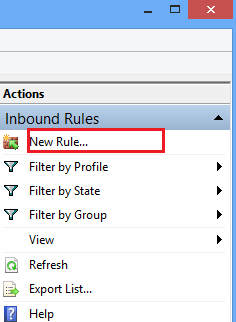
Doing so will open the ‘New Inbound Rule Wizard’ window.
From it, select ‘Port’ as the new Rule Type and click Next. firewall select port For safety purposes, I tried blocking TCP port. Click on Specific local ports. Then choose one port like 80 as shown in the screenshot below. Click Next to continue. firewall block connection 
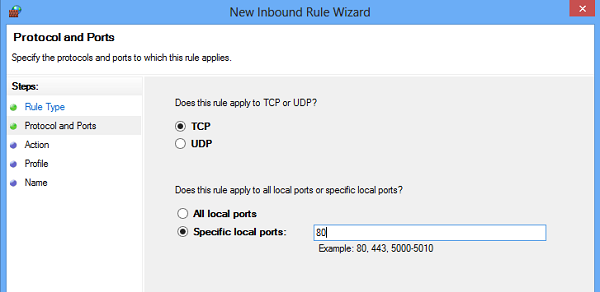
Next, select ‘Block the connection’ as the Action and click Next. firewall block connection blocked 
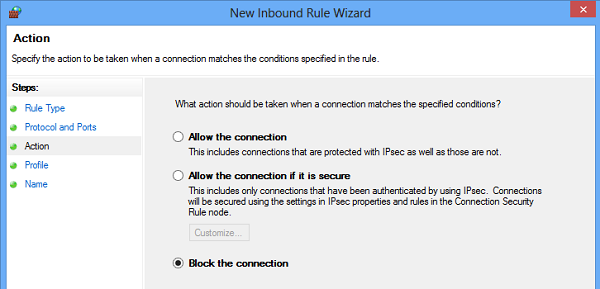
Later, select all the profiles available for different type of connections (Domain, Private and Public) and Click Next to continue. select types of profile 
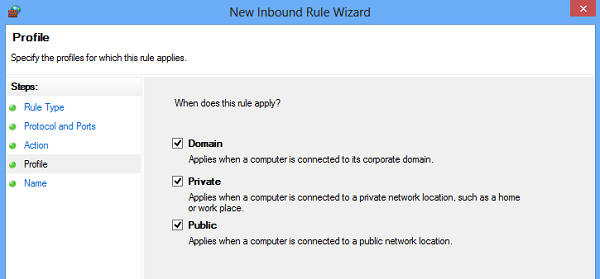
Give a name of your choice to the new rule. I used ‘block suspicious ports’. If you want, you can add description to the new rule. This step is however optional. block suspicious 
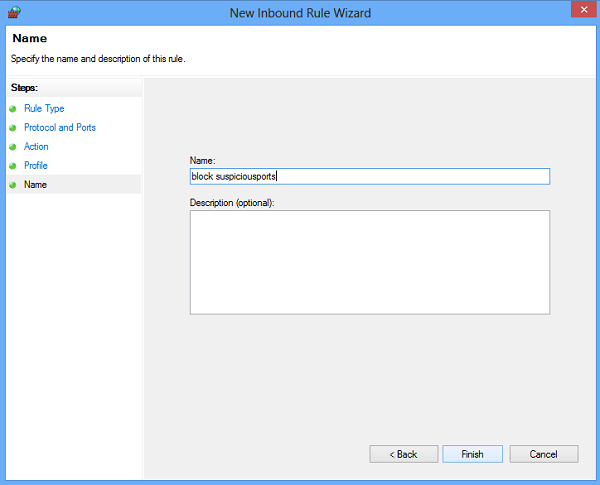
Finally, click the Finish button to configure the settings.

Open port in Windows Firewall

At times, you may you may feel the need of opening a port in the Windows firewall to let a specific IP communicate with your computer.
For example, while playing games. The procedure to open a port remains more or less the same.
All you need to do is follow the instructions in the New Inbound Rule wizard,specify the Port and select Allow the connection.
you may also like this How to Attach Image With Blogger Link on Facebook

what is MSSQL

Today i will tell you that
What is a MSSQL ?
What is MSSQL capable of?
What is MSSQL used for?

What is a MSSQL?

MSSQL is short for Microsoft SQL Server. It is a relational web hosting database that is used to store web site information like blog posts or user information.
MSSQL is the most popular type of database on Windows servers.
It is not free but it has many advanced features that make it suitable for businesses.

What is MSSQL capable of?

In basic terms, an MSSQL database is capable of storing any type of that you want. It will let you quickly store and retrieve information and multiple web site visitors can use it at one time.
You will use SQL statements to accomplish all of this.
In more technical terms, most versions of MSSQL have the following features:
*.Buffer management
*.Logging and Transaction
*.Concurrency and locking
*.Replication services
*.Analysis services
*.Notification services
*.Integration services
*.Full text search service
*.Stored procedures
*.Triggers
*.Views
*.Sub-SELECTs (i.e. nested SELECTs)

What is MS SQL used for?

MSSQL is the database of choice for web applications on a Windows platform (using .NET or ASP).
These languages make is extremely easy to connect to a MSSQL database.
It is also used for many popular content management systems and other scripts.
you may also like this how to choose better web hosting

How to Attach Image With Blogger Link on Facebook

How to Attach an Image With a Blogger Link on Facebook

If you maintain a Blogger blog for your business and have a Facebook account, you can post images on your timeline and attach a link back to the Blogger post. Facebook is able to scan your post for images automatically and enables you to choose the image that you wish to appear with the link.
You can present your products to your Facebook friends with just a few keyboard and mouse clicks; you don't even need to upload the image to Facebook.

Step 1

Navigate to your post on Blogger. You don't need to be logged in to your Blogger account, but the blog post must contain the image that you want to post on Facebook.

Step 2

Select the URL of the post in the address bar at the top of the Web browser and press "Ctrl-C" to copy the URL to the clipboard.

Step 3

Navigate to Facebook and log in to your account.
If you're using a business page, navigate to your page.

Step 4

Click inside the "What's on your mind" box if you wish to post the image on your timeline, or inside the "Write something" box if you are using a business page.
The boxes are located under Status.

Step 5

Press "Ctrl-V" to paste the URL from the clipboard into the text box. Facebook automatically scans your Blogger post for images and displays the first image under the link, along with your post title.

Step 6

Click the small arrows under the image to select the image that you wish to post with the link.

Step 7

Click "Okay" to post the image, along with the link, on your Facebook business page or timeline.
How to Post Links on Facebook Without the Long Link

How to Write Private Post on Facebook

How to Write a Private Post on Facebook

When you use Facebook as a marketing tool, you generally want each post to reach as many people as possible.
Yet Facebook also lets you compose private posts that only specific contacts can view.
For example, if you have created a separate friend list for your colleagues at work, you can write a Facebook status that only your colleagues can read.
You can also create posts visible to individual contacts to restrict access still further.

Step 1

Create a new Facebook post.
For example, click "Status" on your profile's timeline and type into the box labeled "What's on your mind?"

Step 2

Click the audience selector icon next to the "Post" button.

Step 3

Click "Custom" in the pop-up menu to open the Custom Privacy dialog box.

Step 4

Click the drop-down box labeled "These people or lists:" and select "Specific People or Lists."

Step 5

Type a contact's name or the name of a friend list into the text box below the drop-down box to open a new drop-down menu. Click a name from the menu.

Step 6

Click "Save Changes" to close the dialog box and click "Post" to publish the private post.
you may also like thisHow To Add Facebook Like Button to Blogger theme

How to Post Links on Facebook Without the Long Link

How to Post Links on Facebook Without the Long Link

Facebook offers its own link shortener service that you can use to link to content on Facebook itself, but to post short links to external Web pages on your business page or Facebook Timeline you'll need to use a third-party, link-shortener service to condense the original long URL address. After shortening the link address with the third-party service, you can post it to Facebook in the same way as a standard link in the Status area on a business page or in the "What's on your mind" box on your Timeline page or homepage.
Facebook will parse the shortened link and retrieve the title, description and image thumbnail for the linked content in the usual way.

Step 1

Copy the URL address of the external Web page that you want to link to on Facebook.

Step 2

Go to your preferred third-party, link-shortener service, such as the Google URL Shortener, Bitly or Tiny URL.

Step 3

Paste the link you copied into the URL-entry field on the service's homepage.

Step 4

Click the "Shorten URL," "Shorten" or "Make Tiny URL" button.

Step 5

Highlight and copy the shortened URL.

Step 6

Go to your business Facebook page, Facebook Timeline or Facebook homepage.

Step 7

Paste the shortened link into the Status field at the top of the page.
Wait for Facebook to scan the link and retrieve the title, description and image thumbnail.

Step 8

Type a message in the text field if you want to include your own text with the link. Erase the shortened link in the text box after the preview appears, if desired.

Step 9

Click the "Post" button to add the shortened link to your Facebook page or Timeline.
you may also like this how to add facebook share button to blogger theme

How To Add Facebook Like Button to Blogger theme

how to add facebook like button in blogger

facebook like button to blogger It’s always important to provide your readers with easy access to share and like your content.
In this post I will teach you how to easily add one of Facebook’s ever-so-popular “Like” buttons to each post on your Blogger blog.
It’s really easy, follow along below:
1. Go to your Blogger dashboard
2. Click on Template in the sidebar, then Edit HTML
3. Click inside of the text area and press CTRL + F (or CMD + F on a Mac) to open up the “Find” text box.
4. Inside the “find” box in the top right corner of the text area, enter this code and press enter TWICE.You want to work with the second instance of it. This code acts like the place holder for all of your post content.
If you want to add your Like button to the top of your posts, add one of the following Facebook codes ABOVE this code.
If you want the Like button on the bottom of your posts, add it UNDER this code.facebook button types

Copy this Facebook button code below for a Horizontal count style:

Or,

copy this code for a Vertical count style:

If you prefer it without the count, use this Standard code:

if you have any question plz comment blow i will reply soon as posible thanks
you may also like this How to Attach Image With Blogger Link on Facebook