How to install java application on Window computer

how to run java application on window pc

Java J2ME On Windows If you want to try your JAVA games before installing them then you can do this on your Windows PC. It is possible to run JAVA J2ME Apps and Games on your Windows PC by using KEmulator.
This software is a mobile game emulator which can emulate java mobile games and apps of jar format on your Windows PC.
It supports Open GL Graphics Acceleration and MIDP 2.0.
It uses the java plugin ( JAVA Runtime Environment ) installed in your PC to run these java applications.
So it is important that the latest version of JAVA JRE (also called JAVA Runtime Environment) should be installed on your PC.
If not, then you can download JAVA JRE from below links:
Java Runtime Environment Latest Version (32-bit)
Java Runtime Environment Latest Version(64-bit)
You can download the latest version of KEmulator for your Windows PC from the download link given below:
Free download KEmulator Latest Version
Size: 2.51MB

Minimum System Requirements for KEmulator

Operating System:Windows XP/Vista/Windows 7/ Windows 8 (32 bit & 64 bit)
RAM:256 MB
Graphics:OPEN GL
Extra Plugins:JAVA JRE

Advantages

*.Easy to Use
*.Supports MIDP 2.0(JSR118)
*.Supports multiple Device UI
*.Supports OPEN GL Graphics Acceleration
*.Supports Custom Resolution

Disadvantages

*.Cannot run jad files

How to Install KEmulator

*.Run the executable file downloaded from the above link to start the installation wizard.
*.Click Next button to continue and then it is recommended to change the destination folder to a drive other than ‘C’, because it runs better in other drives and crashes rarely. [In my opinion, this is because KEmulator runs better in FAT 32 file system than in NTFS.]kemulater 
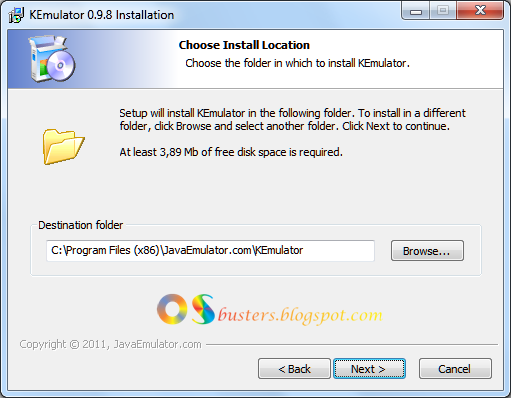
KEmulator-Installation-Choose Destination Folder
*.Then complete the installation by going through the installation wizard and get ready to launch your favourite J2ME Applications on your PC.

How to Launch JAVA Mobile Applications in KEmulator

In the Midlet of the menu bar click Load Jar and then browse for the java application or game you want to launch.kemulator load 
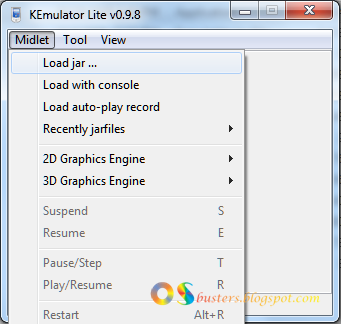
KEmulator-Launch JAVA Applications assassincreed
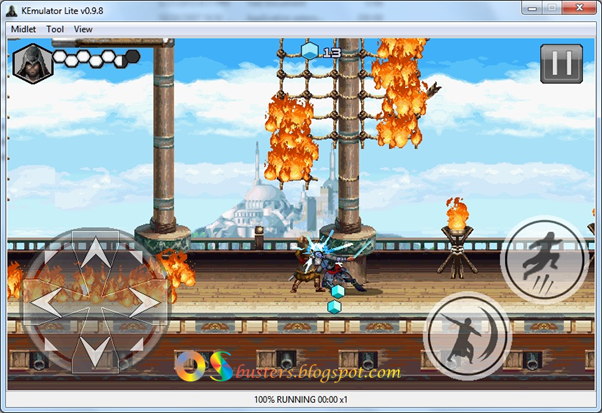
KEmulator-Assassin's Creed Screenshot 800x480 mode

Other Customizations KEmulator-Options and Properties

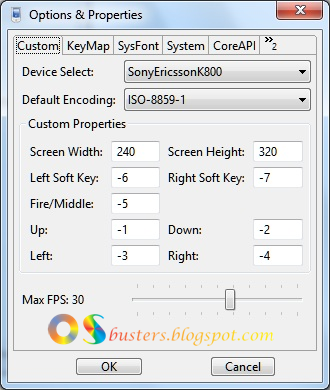
For more customizations go to View of the menu bar and click the Options, then you can change the resolution (screen width and height), Device, FPS etc. according to the game requirement or your wish.
KEmulator supports custom resolution; you can change the screen width and height to 480X800, 480X640, 600X1200 etc. according to your wish.
Also you can rotate the screen to 90 of rom the View of menu bar to run a game in landscape mode. You can also change the controls from the Key Map tab of Options & Properties. Now enjoy your Nokia, Samsung, Sony Ericsson, Motorola, LG Mobile Games on your Windows PC by using KEmulator.
You might also like
how to Run Android Apps on Windows PC

How to install Android application on Mac OSX

How to install Android application on Windows computer

How to run android apps on pc window

If you are an Android Fan and want to run your favorite Android applications on your Windows PC then you have come to the right place.
Running Android games and apps on Windows PC is now possible by using the software:
1.BlueStacks App Player Beta

Running Android Applications using BlueStacks App Player

bluestacks BlueStacks
BlueStacks is company developing software to bring Android applications right on your desktop PC.
BlueStacks has developed its latest App Player Beta which works on its “LayerCake” technology and can run Android apps and games in full screen and windowed mode. It has won the Best Software Award at CES 2012.
The software allows you to run your Android apps and games right on your desktop PC that you might enjoy on your Android smartphone or tablet.
It comes with some preloaded Android apps and millions are available for download.
It also allows you to sync apps from your smartphone or tablet to your PC. You can enjoy those Android apps also on your PC that you have purchased for your Android device.
This software also has a virtual accelerometer support which can be controlled by the arrow keys of the keyboard. So this software is just like an Emulator for an Android Device. It is also available for Mac OS X as BlueStacks for Mac OS X.

Minimum System Requirements

OS:Windows XP/ Windows Vista/ Windows 7/ Windows 8 (All 32bit. Does not work on 64bit)
Processor:Intel Pentium 1.66 GHz CPU or higher
RAM:1GB 2GB
Graphics:500 MB

Advantages

1.Runs most of the Android Apps on Windows PC
2.Can synchronize apps between Windows and Android
3.Has accelerometer support (can be controlled by the arrow keys of the keyboard)
4.Supports full screen and windowed mode.

Disadvantages

1.Runs only on 32bit systems
2.Does not run on a system having RAM less than 2GB

Download

You can download the latest version of BlueStacks for free from the below link:
Free Download Bluestacks App Player Latest Version
Size: 8.8 MB

How to Install and Use

1.First download the BlueStacks App Player installer from the above link and the run the executable file thus downloaded.
2.The installer will start. Then just accept the license agreement and click Next.
3.Then choose Install, the installer will download the required files and will complete the installation.
4.After the installation, start BlueStacks from the All Programs of the Start button of your Windows.
5.Just wait and after that you will see the welcome screen of the Bluestacks App Player.
6.To run an apk file, just double click on it.
7.Enjoy running Android Apps on Windows.bluestacks 
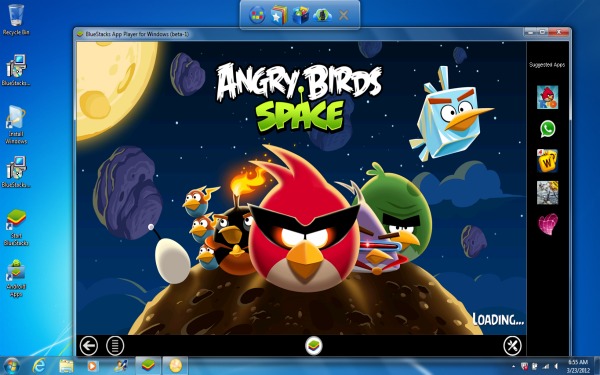
BlueStacks-Angry Birds on Windows
you may also like this
how to run java application on window pc

What is Emulator ?


How to restrict the number of simultaneous connections to a server in FileZilla

default FileZilla is configured to transfer 5+ files at a time, which means that each time when you make a transfer, the application will initiate 5+ simultaneous connections to the server.
If you are hosted on a shared server and trying to transfer many files, the server firewall may block your IP address due to excessive number of simultaneous connections from one and the same address.
There is an easy way to reduce the number of simultaneous connections and transfers in FileZilla.
To reduce the number of simultaneous transfers, open the application ->Edit -> Settings -> Transfers. There you will see a field called Maximum simultaneous transfers- change the value to 1 and click on OK to save the changes.
To reduce the number of simultaneous connections, open the application ->File->Site Manager-> select your site -> go to Transfer Settings tab -> check the box next to Limit number of simultaneous connections and set Maximum number of connections to 1 . Click OK to save the changes.
how to create Filezilla setting
How to install FileZilla on Windows, Linux and Mac OS
how to connect to the server using filezilla
top best and most popular 10 FTP client list

how to create Filezilla setting

How to create filezilla setting ?

If you experience any issues when uploading/downloading files with FileZilla, make sure you set the following recommended options in its configuration:
1. From Edit->Settings->Connection->FTP-> tick Passive ( recommended ).
2. From Edit->Settings->Connection->FTP-> tick Allow fall back to other transfer mode on failure.
3. From Edit->Settings->Connection->FTP-> tick Send FTP keep-alive commands.
4. Restrict the number of simultaneous connections and transfers.
|
how to connect to the server using filezilla

How to install FileZilla on Windows, Linux and Mac OS

How to install FileZilla on Windows, Linux and Mac OS ?

In this part of our FileZilla tutorial we will show how to install the FTP client on the three most popular operating systems:
Windows, Linux and Mac OS. Before proceeding with the FileZilla installation we should download the corresponding package from the FileZilla Download Section.

FileZilla installation on Windows

The FileZilla installation on the Windows OS is quite simple. Log in your Windows software with an administrator account. After the download of the correct package ( the .exe extension package is recommended ) click on it.
The License Agreement screen will appear. Click on the I Agree button. On the next screen you should decide whether every user of the OS can work with the FTP client or it is allowed only for the admin account. 
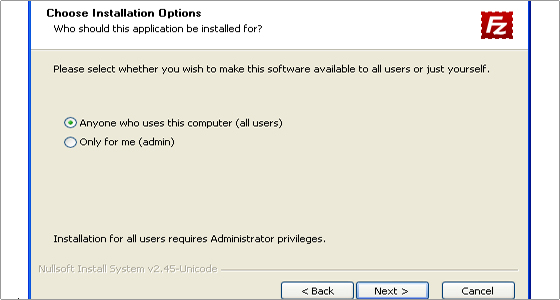
Click on the Next button to proceed. Select the components which you want to install. 
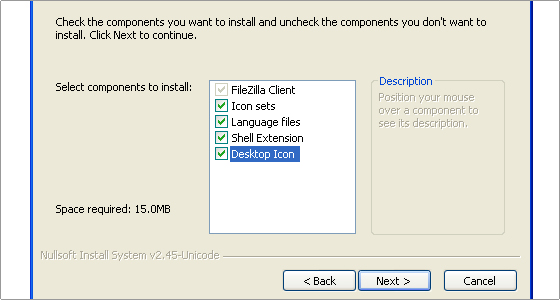
Then click on the Next button. The next window allows you to set the destination folder for the FileZilla installation. 
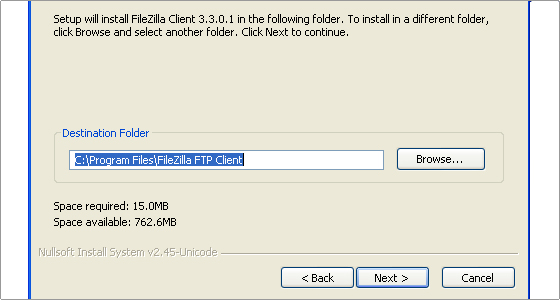
Hit the Next button to continue. Choose the Start Menu folder and click on the Install button. 
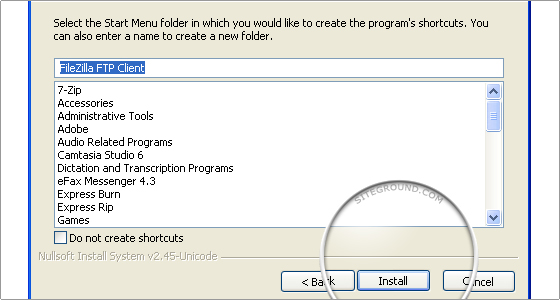
The installation is completed. You can leave the Start FileZilla now check box checked and click on the Finish button. This will start your FileZilla FTP client.

FileZilla installation on Linux

In this section we will inform you how to install FileZilla on the most popular Linux distributions - Ubuntu and Fedora.
Both the distributions allow the FileZilla software to be installed through their package managers.
In Ubuntu open a terminal window, log as the root user and execute the following command:
apt-get install filezilla You will be prompted whether you want to continue with the installation.
Type "Y" and click on the Enter key of your keyboard. The installation will be completed. You can find the software in your Applications->Internet menu. 
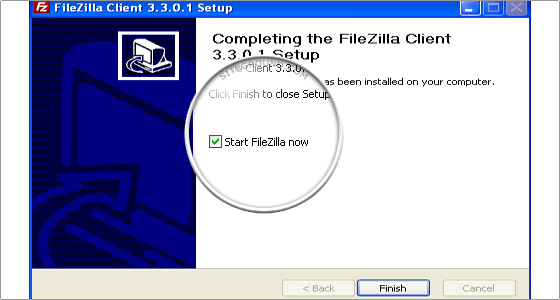
The installation on a computer with a Fedora distribution is almost the same.
First you need to setup the RMP fusion repositoryin order to install the software.
Then execute the following command as the root user in the terminal window:
yum -y install filezilla

FileZilla installation on Mac OS

Basically the installation of the FileZilla software on a Mac OS can be completed in several steps. First you need to download the correct package for your processor.
Then you need to double click on the package file and it will be automatically extracted.
After that you can use the software. .
how to connect to the server using filezilla
top best and most popular 10 FTP clients

how to connect to the server using filezilla

How to connect to server using filezilla ?

FileZill is a free FTP client which is available for most of the popular operating systems including Windows and Mac OS.
In order to use this FTP client on your PC, you should follow these steps:
1. Download FileZilla to your local computer
2.Install the client
3.Specify your FTP login details
4.Connect to your FTP account on the server The installation package of FileZilla can be obtained from the official website of the application. Once you download it, start the file and follow the setup instructions until the application is successfully installed. Finally, start FileZilla. At the top of the application you will find fields for the FTP connection that you need to fill as follows:
*.FTP server name: enter your domain name here or the name of the hosting server where your account resides (e.g. exaple.com )
*.FTP username:
your cPanel username
*.FTP password:
your cPanel password When you’re finished entering your settings, connect to your account by clicking the
“Quickconnect”
button in your FileZilla toolbar. When you connect successfully, you’ll see a note in the status area at the top of your screen indicating that you are connected.
The files and folders on your own computer will appear in the “Local Site” pane on the left side of your screen.
Your Web Hosting account files and folders will appear in the “Remote Site” pane on the right. You can now transfer files and folders between your local computer and your hosting account by dragging them from the left pane to the right.
must see our most popular FTP client list

top best and most popular 10 FTP client list

Top best and popular FTP clients list

1. FileZilla

– All platforms ( free )

2. SmartFTP

– Windows ( free & paid )

3. FireFTP

– All platforms with Firefox ( free )

4. WinSCP

– Windows ( free )

5. Cyberduck

– Mac & Windows ( free )

6. FlashFXP

– Windows ( free & paid )

7. CuteFTP

– Mac & Windows ( free & paid )

8. WS_FTP

– Windows ( trial & paid )

9. GoFTP

– All platforms ( free & paid )

10. CoffeeCup

- Windows Free FTP – ( free )
Direct FTP – ( trial & paid )

what is FTP ( file transfer protocol )

what is FTP ( file transfer protocol )

FTP or File Transfer Protocol is an internet protocol used to transfer files across the internet from one computer to another.
For example, when you are installing a software like WordPress on your website, then you will most likely use FTP in order to upload all of the WordPress files from your personal computer to your server. In order to do this, you need something called an FTP client. The FTP client is software that runs on your personal computer and allows you to transfer files to and from your web server. Filezilla and WS_FTP are examples of easy to use FTP clients.
Most WordPress web hosting service providers give users access to FTP, so that they can upload or download files from their web hosting server directly from within their control panel. WordPress users may need an FTP client to upload WordPress files to their web hosting server before they can install WordPress. Besides installing WordPress, if you plan on using plugins or modifying your theme’s functions.php file then it is good to understand how to use FTP.
Sometimes adding a plugin or making a change to the functions.php file can cause the “white screen of death” and lock you out of your site due to poorly written code or compatibility issues between plugins. If you know how to use FTP, then you can simply connect to your server using your FTP client and delete the files that are causing the problems

what is free web hosting

What is free web host ?

A free web hosting serviceis a web hosting service that is free, usually advertisement-supported. Free web hosting that does not make use of advertising also exists; these often come with some limits on usage, however. Free web hosts will usually provide a subdomain ( yoursite.example.com ) or a directory ( www.example.com/~yourname ).
In contrast, paid web hosts will usually provide a second- level domain along with the hosting ( www.yourname.com).
Many free hosts do allow use of separately-purchased domains. Rarely, a free host may also operate as a domain name registrar. There are also some free domain companies which may provide free third level domain names free with DNS and other facilities.

how to choose web hosting - part 3

13. Site Backup

There are times when a site crashes. Perhaps a hacker got into your WordPress blog and replaced your index.php file, or your entire database got nuked, or the server had a severe hard disk failure.
If your web host does site backups regularly then there is nothing to worry about when these incidents happen.
Your hosting provider should be able to restore back your full (or at least, a big chunk of) site in no time.
On backups, here are a few key questions to ask your web host:
*.Does your web host provide full backups regularly?
*.Can site backup be done easily via the control panel?
*.Can you create auto backup your site easily via cron job or other program?
*.Can you restore your backup files by yourself easily (so you don’t have to wait for the support staffs to do it for you during disaster time)?

14. An Easy-to-use Hosting Control Panel

A user-friendly and functional hosting control panel is very, very important.
It doesn’t matter if it’s a cPanel or a Plesk or a third party control panels (like what we have at GoDaddy) – we are okay as long as it is user-friendly and come with all the necessary functions. Without an adequate control panel, you will be left at the mercy of the hosting tech support staff – even if all you need is some basic server changes.
I once had an account with IX Web Hosting, though it’s not a bad host – multiple dedicated IPs at a very reasonable price plus great tech support – but I had to cancel my account because it’s custom control panel is such a pain in the ass.

15. Does The Web Host Provide 24/7 Live Chat Support?

Personally I prefer live chat over phone, feel free to change this factor to “24/7 Telephone Support” if you think otherwise. What we want is someone who can throw us the life saving rope instantly when we press the S.O.S button.
go to previous. part

How to choose web hosting - part 2

6. Refund Policy

Should you choose to cancel your host within the trial period, does the company provide full money return?
What is the hosting company’s refund policy after the trial session?
Is there any cancellation charges?
These are some basic questions to ask before signing up.
It’s important to know your hosting provider handle customer refunds so that you don’t have to lose too much money when things go wrong.
There are some hosting companies that charge absurdly high cancellation fees when users cancel their account during trial period. Our advice? Avoid these hosting providers at all cost. On the other hand, some hosting companies provide anytime money back guarantees where you can ask for a pro-rated refund after your trial period (good eh?).

7. Cron Jobs, Auto Script Installer, .htaccess, and Server Side Include

We are surprise that some web hosts out there still do not offer these basic hosting features these days. You need Cron for day-in-day-out operations, Auto Script Installer (like Fantastico, Simple Scripts, and Quick Installer) for time saver, .htaccess access for security/page redirects/etc purposes, SSI for easier site maintenance (when you are building a static site), and FTP access easy file.
Unless you are signing up on a specialty host like WP Engine, else these basic features are must-have and you shouldn’t settle with hosting providers that do not supply them.

8. e-Commerce Features

Are you running an e-commerce website?
Do you need to process business transactions on your website?
Are you using any specific shopping cart software?
If yes, then it is important for you to pick a web host with sufficient e-commerce features support. SSL certification, dedicated IP, and one-click shopping cart software installation are some of the essential features / supports you will need.

9. Account Suspension:

What Are the Limitations on Your Hosting Accounts?
Here’s a money tip that most hosting review sites will not tell you:
Hosting companies will pull the plug and suspend your account if you are using too much CPU power (yes, unlimited hosting is not unlimited) or violating the rules.
Before you sign up on a web host, it is important that you read the rules and know your limits.

Why read hosting company TOS?

Knowing your account limits help you understand two things:
1.How Generous (Or Stingy) Is Your Shortlisted Web Host – Should you go with that web host, or the other with looser restrictions?
2.How Transparent Is Your Hosting Company – Can you trust the words coming out from your hosting company?
Honest hosting company normally will have very clear guidelines on account limitation.

10. Environmental Friendliness

Having an eco-friendly website host is the primary concern for some webmasters.
According to science studies, a web server on average produces more than 630kg of CO2 (which is a lot!) and consumes 1,000 KWh of energy annually. A green host on the other hand, theoretically produces zero CO2. There is indeed a huge difference between a green web host and a non-eco-friendly web host.
If you care about the environment and wish to cut down on your carbon footprint, pick a web host that runs on renewable energy (or at least, a webhost that offsets its energy consumption via green certificates).

11.Email@yourdomain.com

If you wish to host email accounts together with your website, then you should look at the email feature before signup. Most hosting companies will come with the ability to host your own email (something like email@ yourdomain.com) but hey, it’s always better to check and be sure of it, yeah?
In case email feature is not provided, no big deal. There are a number ways you can own an email account at your own domain (email@yourdomain). Google Email Apps, for example, is a free and easy one – you get the first 10 email accounts for free and $5/account/mo moving up (at this time of writing).

12. Hosting Subscription Period

Do not be surprise if you discover some web hosts force their customers to take up unreasonably long contracts. Lunarpages, for example, changed their pricing structure in June 2009 and lured customers to take up a 5-year hosting contract in order to enjoy the $4.95/mo deal. Lunarpages no longer offers such a deal now but still this is a good example in our case.
Should you commit to long term hosting contracts? Our answer is no – Never signup web host with more than 2 years upfront.
go to previous or next part.

how to choose better web hosting - 15 thing you must know

How to chose right web hosting ?

How do you decide if a web host is good?
Do the bandwidth and disk storage features still matter these days? Which type of hosting service should you go with?
We will get to the answers for these questions in this article. How to pick up the right web host :
15-Point Checklist

1. Know Your Own Hosting Needs

You can never get the right web host without knowing what you need.
Forget about our general list of top 10 web host for a while and think thoroughly on your own needs.
*.What kind of website are you building?
*.Do you need Windows applications?
*.Do you need a special version of software (ie. PHP)?
*.Does your website need special software?
*.How big (or small) can the web traffic volume go?
These are some of the basic questions to be answered. Have a plan with your website and try figure out what will happens next for the next 12 months.
For newbies, the general basic rule is to always start small with a good shared hosting account. A shared hosting account is cheap, easy to maintain, and sufficient for most new sites. Plus, you can always upgrade to VPS or dedicated hosting in the later stage when your site grows bigger.

2. Server Uptime Record

Nothing is more important than having a 24×7 operating web host. You need a web host is operating on a powerful server and stable network connections. 99.5% and above is the recommended uptime score; anything below 99% is unacceptable. There are a number of different ways to obtain a web host uptime info. For one, we features latest hosting uptime score in most of our hosting reviews. Alternatively, you can simply track your web host with server monitor tools – many of these tools are free on trial and are very to use.

3.Multiple Addon Domains

Domain names are cheap – so cheap that it is hard to resist not owning more than one. In fact, most webmasters own dozens of domain names these days. To host these domains, you will need extra hosting space. And this is why it is important to have a hosting account that allows adding multiple domains. Generally, most hosting companies allow at least 25 addon domains in one account nowadays but you can never be sure. Some years ago I was careless and signed up on a web host that allows only one domain. And, I was holding more than 10 parked domains at that time! Do not repeat my mistake – always check the domain capacity before you make a purchase.

4. Server Upgrades Options

Shared web hosts are pretty powerful these days. On a very rough guestimation, a hared hosting account should be sufficient to support a proper-optimized WordPress blog with 30,000 – 40,000 monthly unique visitors. You should be doing alright on a hared host if you manage to limit your concurrent database connections below 20 (this is why I said it’s always best to start with a hared hosting if you are new).
However, if you expect your website to grow really big in next two or three years, then you should consider picking up a web host with room to grow. By grow, I mean upgrading your web host – from shared hosting to VPS to dedicated server – for more processing power, memory capacity, disk storage, and better security features.

5. Renewal Prices

Hosting deals, shared hosting especially, are normally selling very cheap on signup prices but charge much higher on renewals. It is an industry norm. Unless you are willing to switch host every two or three years, there is no way to avoid the high renewal prices. In general, we think any price tag below $10/mo is acceptable but you might have a lower tolerance. So, to avoid any unpleasant surprise, you should check the TOS and make sure you are okay with the renewal prices before signup. One quick way to do this is to click on the hosting company’s TOS link (usually at the bottom of homepage), press Ctrl + F, and search for kewyord “renewal” or “renew”.
go to nextpart

what is web hosting

What is web hosting ?

When you make a website and want other people to see it, you will need to publish (or upload) it with a web hosting service.
Web hosting services work by storing your website files in high-powered computers (web servers) connected to a very fast network. When someone types in your web address ( such as www.google.com), the Internet connects to the web server holding your website files and then transfers your website information back to their computer. From there they can surf and view the pages of your website.

Any thing related to managing these servers and its software, security, support, bandwidth, speed and so much more, is what we are all about ! Because we provide web hosting services to over a million websites, we have special data centers that are built from the ground up to serve the purpose of web hosting.

types of the web hosting

How many types of web hosting?

There are various types of web hosting services available to host your website.
Before signing up for web hosting services, it is important to understand what kind of service your website needs, the kind of server you or your business needs, your budget, and what type of services the web host offers. Hosting options available are:
*.Free Hosting
*.Shared Hosting
*.Dedicated Hosting
*.Collocated Hosting

Free Hosting

Free web hosting can be a good choice when you just want to build a non-critical website for fun. Very often in a free hosting environment, connection speed is slow, website can be down frequently, and advertising banners is automatically added to your website. Some companies require you to purchase your domain name to receive free hosting services from them, while others offer you a free subdomain under them, such as [ yourname.webhostname.com].
Be careful as you will not be able to transfer these free subdomains. But you can install your costom domain

Shared Hosting

In a shared hosting environment, your and other website owners shared one server. This includes sharing the physical server and the software applications within the server. Shared hosting services are affordable because the cost to operate the server is shared between you and these other owners. There are, however, a number of down sides, such as being slower.

Dedicated Hosting

In a dedicated hosting environment, you have the entire web server to yourself. This allows for faster performance, as you have all the server’s resources entirely, without sharing with other website owners. However, this also means that you will be responsible for the cost of server operation entirely. This is a good choice for websites that requires a lot of system resources, or need a higher level of security.

Collocated Hosting

In this type of hosting, you will purchase your own server and have it housed at a web host’s facilities. You will be responsible for the server itself. An advantage of this type of hosting service is you have full control of the web server. You can install any scripts or applications you need.